Process篇 2 - Android 进程的创建

[toc]

基于 Android 7.1.1 源码,分析进程的创建!

1 前言

当 Android 系统在启动一个应用进程时,如果发现某个进程没有创建,那就要先创建这个进程, Android 系统中每一个应用进程,包括 SystemServer 进程都是由 Zygote 直接孵化出来的!

本片文章,就来总结下进程的 fork 流程!

2 Process - prepare fork

我们来继续看:

2.1 Process.start

框架层开始创建进程会调用 Process.start 方法,我们进入这个方法来看看:

1
2
3
4
5
6
7
8
9
10
11
12
13
14
15
16
17
18
19
20
21
22
23
public static final ProcessStartResult start(final String processClass,
final String niceName,
int uid, int gid, int[] gids,
int debugFlags, int mountExternal,
int targetSdkVersion,
String seInfo,
String abi,
String instructionSet,
String appDataDir,
String[] zygoteArgs) {
try {
//【1】这里是进入 Zygote 方法了!
return startViaZygote(processClass, niceName, uid, gid, gids,
debugFlags, mountExternal, targetSdkVersion, seInfo,
abi, instructionSet, appDataDir, zygoteArgs);

} catch (ZygoteStartFailedEx ex) {
Log.e(LOG_TAG,
"Starting VM process through Zygote failed");
throw new RuntimeException(
"Starting VM process through Zygote failed", ex);
}
}

2.2 Process.startViaZygote

我们接着来看,进入了:startViaZygote 方法,参数传递:

  • final String processClass,
  • final String niceName,
  • final int uid,
  • final int gid,
  • final int[] gids,
  • int debugFlags,
  • int mountExternal,
  • int targetSdkVersion,
  • String seInfo,
  • tring abi,
  • String instructionSet,
  • String appDataDir,
  • String[] extraArgs
    1
    2
    3
    4
    5
    6
    7
    8
    9
    10
    11
    12
    13
    14
    15
    16
    17
    18
    19
    20
    21
    22
    23
    24
    25
    26
    27
    28
    29
    30
    31
    32
    33
    34
    35
    36
    37
    38
    39
    40
    41
    42
    43
    44
    45
    46
    47
    48
    49
    50
    51
    52
    53
    54
    55
    56
    57
    58
    59
    60
    61
    62
    63
    64
    65
    66
    67
    68
    69
    70
    71
    72
    73
    74
    75
    76
    77
    78
    79
    80
    81
    82
    83
    84
    85
    86
    87
    88
    89
    90
    91
    92
    93
    94
    95
    96
    97
    98
    99
    100
    101
    102
    103
    104
    private static ProcessStartResult startViaZygote(final String processClass,
    final String niceName,
    final int uid, final int gid,
    final int[] gids,
    int debugFlags, int mountExternal,
    int targetSdkVersion,
    String seInfo,
    String abi,
    String instructionSet,
    String appDataDir,
    String[] extraArgs)
    throws ZygoteStartFailedEx {
    synchronized(Process.class) {
    //【1】创建 cmd 命令libeia!
    ArrayList<String> argsForZygote = new ArrayList<String>();

    // --runtime-args, --setuid=, --setgid=,
    // and --setgroups= must go first
    argsForZygote.add("--runtime-args");
    argsForZygote.add("--setuid=" + uid);
    argsForZygote.add("--setgid=" + gid);

    if ((debugFlags & Zygote.DEBUG_ENABLE_JNI_LOGGING) != 0) {
    argsForZygote.add("--enable-jni-logging");
    }
    if ((debugFlags & Zygote.DEBUG_ENABLE_SAFEMODE) != 0) {
    argsForZygote.add("--enable-safemode");
    }
    if ((debugFlags & Zygote.DEBUG_ENABLE_DEBUGGER) != 0) {
    argsForZygote.add("--enable-debugger");
    }
    if ((debugFlags & Zygote.DEBUG_ENABLE_CHECKJNI) != 0) {
    argsForZygote.add("--enable-checkjni");
    }
    if ((debugFlags & Zygote.DEBUG_GENERATE_DEBUG_INFO) != 0) {
    argsForZygote.add("--generate-debug-info");
    }
    if ((debugFlags & Zygote.DEBUG_ALWAYS_JIT) != 0) {
    argsForZygote.add("--always-jit");
    }
    if ((debugFlags & Zygote.DEBUG_NATIVE_DEBUGGABLE) != 0) {
    argsForZygote.add("--native-debuggable");
    }
    if ((debugFlags & Zygote.DEBUG_ENABLE_ASSERT) != 0) {
    argsForZygote.add("--enable-assert");
    }
    if (mountExternal == Zygote.MOUNT_EXTERNAL_DEFAULT) {
    argsForZygote.add("--mount-external-default");

    } else if (mountExternal == Zygote.MOUNT_EXTERNAL_READ) {
    argsForZygote.add("--mount-external-read");

    } else if (mountExternal == Zygote.MOUNT_EXTERNAL_WRITE) {
    argsForZygote.add("--mount-external-write");

    }
    argsForZygote.add("--target-sdk-version=" + targetSdkVersion);

    //TODO optionally enable debuger
    //argsForZygote.add("--enable-debugger");

    // --setgroups is a comma-separated list
    if (gids != null && gids.length > 0) {
    StringBuilder sb = new StringBuilder();
    sb.append("--setgroups=");

    int sz = gids.length;
    for (int i = 0; i < sz; i++) {
    if (i != 0) {
    sb.append(',');
    }
    sb.append(gids[i]);
    }

    argsForZygote.add(sb.toString());
    }

    if (niceName != null) {
    argsForZygote.add("--nice-name=" + niceName);
    }

    if (seInfo != null) {
    argsForZygote.add("--seinfo=" + seInfo);
    }

    if (instructionSet != null) {
    argsForZygote.add("--instruction-set=" + instructionSet);
    }

    if (appDataDir != null) {
    argsForZygote.add("--app-data-dir=" + appDataDir);
    }

    argsForZygote.add(processClass);

    if (extraArgs != null) {
    for (String arg : extraArgs) {
    argsForZygote.add(arg);
    }
    }
    //【2.3】接着调用 zygoteSendArgsAndGetResult 方法,让爱更进一步!
    return zygoteSendArgsAndGetResult(openZygoteSocketIfNeeded(abi), argsForZygote);
    }
    }

这个的过程是生成 argsForZygote 数组,里面分装了 Zygote 需要的参数!!

2.2.1 Process.openZygoteSocketIfNeeded

这里调用了 openZygoteSocketIfNeeded 方法,根据当前的 abi 选择 Zygote 的位数:32 位还是 64 位的,然后连接 Zygote,并返回 Zygote 的引用对象:

1
2
3
4
5
6
7
8
9
10
11
12
13
14
15
16
17
18
19
20
21
22
23
24
25
26
27
28
29
30
31
private static ZygoteState openZygoteSocketIfNeeded(String abi) throws ZygoteStartFailedEx {
if (primaryZygoteState == null || primaryZygoteState.isClosed()) {
try {
//【1】连接主zygote!
primaryZygoteState = ZygoteState.connect(ZYGOTE_SOCKET);
} catch (IOException ioe) {
throw new ZygoteStartFailedEx("Error connecting to primary zygote", ioe);
}
}

if (primaryZygoteState.matches(abi)) {
//【2】主 Zygote 能和 abi 匹配,返回主 Zygote!
return primaryZygoteState;
}

if (secondaryZygoteState == null || secondaryZygoteState.isClosed()) {
try {
//【3】主 Zygote 不能匹配,连接第二个zygote!
secondaryZygoteState = ZygoteState.connect(SECONDARY_ZYGOTE_SOCKET);
} catch (IOException ioe) {
throw new ZygoteStartFailedEx("Error connecting to secondary zygote", ioe);
}
}

if (secondaryZygoteState.matches(abi)) {
//【4】返回第二个 Zygote!
return secondaryZygoteState;
}

throw new ZygoteStartFailedEx("Unsupported zygote ABI: " + abi);
}

我们接着下面来看!

2.3 Process.zygoteSendArgsAndGetResult

最后,发送参数列表给 Zygote 进程,Zygote 进程会 fork 一个子进程,并返回子进程的 pid!

1
2
3
4
5
6
7
8
9
10
11
12
13
14
15
16
17
18
19
20
21
22
23
24
25
26
27
28
29
30
31
32
33
34
35
36
37
38
39
40
41
42
43
44
45
46
private static ProcessStartResult zygoteSendArgsAndGetResult(
ZygoteState zygoteState, ArrayList<String> args)
throws ZygoteStartFailedEx {
try {
//【1】判断输入参数格式是是否正确,中间不能有换行符!
int sz = args.size();
for (int i = 0; i < sz; i++) {
if (args.get(i).indexOf('\n') >= 0) {
throw new ZygoteStartFailedEx("embedded newlines not allowed");
}
}

final BufferedWriter writer = zygoteState.writer; // 用于向 Zygote 写入数据!
final DataInputStream inputStream = zygoteState.inputStream; // 用于获得 Zygote 的返回数据!

//【2】首先,写入参数的个数!
writer.write(Integer.toString(args.size()));
writer.newLine();

for (int i = 0; i < sz; i++) {
String arg = args.get(i);
//【2.1】写入每一个参数
writer.write(arg);
writer.newLine();
}

//【3】flush BufferedWriter,参数会被写到 ZygoteConnection 对象的 abiList 集合中!
writer.flush();

//【4】创建 ProcessStartResult 实例,记录启动结果,包括 pid
ProcessStartResult result = new ProcessStartResult();

//【5】systemServer 进入阻塞等待状态,直到进程创建成功,返回子进程的 pid!
result.pid = inputStream.readInt();
result.usingWrapper = inputStream.readBoolean();

if (result.pid < 0) {
throw new ZygoteStartFailedEx("fork() failed");
}

return result;
} catch (IOException ex) {
zygoteState.close();
throw new ZygoteStartFailedEx(ex);
}
}

这个方法的主要功能:通过 socket 向 Zygote 进程发送一个参数列表,然后进入阻塞等待状态,直到远端的 Socket 服务端发送回来新创建的进程 pid 才返回!!

以上这些过程仍然在 SystemServer 进程中,接下来,就要进入 Zygote 进程了!!!

3 Zygote - fork Process

3.1 ZygoteInit.main

接着是,进入了 Zygote 进程,我们先去看看 Zygote 的 main 方法看看:

1
2
3
4
5
6
7
8
9
10
11
12
13
14
15
16
17
18
19
20
21
22
23
public static void main(String argv[]) {
ZygoteHooks.startZygoteNoThreadCreation();

try {

... ... ...// 这部分代码是启动 Zygote 时触发的,这个省略不看!

Log.i(TAG, "Accepting command socket connections");
//【3.2】进入 runSeletLoop 方法!
runSelectLoop(abiList);

closeServerSocket();

} catch (MethodAndArgsCaller caller) {
//【3.4】上面的 runSelectLoop 方法会抛出 MethodAndArgsCaller 异常就会进入 caller.run 方法
// 我们后面再看!
caller.run();
} catch (Throwable ex) {
Log.e(TAG, "Zygote died with exception", ex);
closeServerSocket();
throw ex;
}
}

接着来看,进入了 runSelectLoop 方法,runSelectLoop 是一个死循环,不断的读取发送到 Zygote 的消息!

3.2 ZygoteInit.runSelectLoop

这个方法很关键,在 openZygoteSocketIfNeeded 方法中,System Sever 会通过 Socket 建立和 Zygote 进程的连接,并向 Zygote 写入执行参数!

而 ZygoteInit.runSelectLoop 会创建一个循环,不断的读取 abiList 中的指令,进行处理!

1
2
3
4
5
6
7
8
9
10
11
12
13
14
15
16
17
18
19
20
21
22
23
24
25
26
27
28
29
30
31
32
33
34
35
36
37
38
39
40
41
42
43
private static void runSelectLoop(String abiList) throws MethodAndArgsCaller {
ArrayList<FileDescriptor> fds = new ArrayList<FileDescriptor>();
ArrayList<ZygoteConnection> peers = new ArrayList<ZygoteConnection>();

fds.add(sServerSocket.getFileDescriptor());
peers.add(null);

while (true) {

//【1】采用 I / O 多路复用机制,当客户端发出连接请求或者数据处理请求时,跳过 continue,执行后面的代码
StructPollfd[] pollFds = new StructPollfd[fds.size()];

for (int i = 0; i < pollFds.length; ++i) {
pollFds[i] = new StructPollfd();
pollFds[i].fd = fds.get(i);
pollFds[i].events = (short) POLLIN;
}
try {
Os.poll(pollFds, -1);
} catch (ErrnoException ex) {
throw new RuntimeException("poll failed", ex);
}
for (int i = pollFds.length - 1; i >= 0; --i) {
if ((pollFds[i].revents & POLLIN) == 0) {
continue;
}
if (i == 0) {
//【2】接收到客户端的连接请求,创建 ZygoteConnection 对象!
ZygoteConnection newPeer = acceptCommandPeer(abiList);

peers.add(newPeer);
fds.add(newPeer.getFileDesciptor());
} else {
//【3.3】执行 ZygoteConnection 的 runOnce 方法!
boolean done = peers.get(i).runOnce();
if (done) {
peers.remove(i);
fds.remove(i);
}
}
}
}
}

没有连接请求时会进入休眠状态,当有创建新进程的连接请求时,唤醒 Zygote 进程,创建 Socket 通道 ZygoteConnection,然后执行 ZygoteConnection 的 runOnce() 方法。

3.3 ZygoteConnection.runOnce

这里我们看到 runOnce 方法会抛出一个 MethodAndArgsCaller 异常,但实际上 MethodAndArgsCaller 并不是在 runOnce 中抛出的!

1
2
3
4
5
6
7
8
9
10
11
12
13
14
15
16
17
18
19
20
21
22
23
24
25
26
27
28
29
30
31
32
33
34
35
36
37
38
39
40
41
42
43
44
45
46
47
48
49
50
51
52
53
54
55
56
57
58
59
60
61
62
63
64
65
66
67
68
69
70
71
72
73
74
75
76
77
78
79
80
81
82
83
84
85
86
87
88
89
90
91
92
93
94
95
96
97
98
99
100
101
102
103
104
105
106
107
108
109
110
111
112
113
114
115
116
117
118
119
120
121
122
123
124
125
boolean runOnce() throws ZygoteInit.MethodAndArgsCaller {

String args[];
Arguments parsedArgs = null;
FileDescriptor[] descriptors;

try {
//【1】读取socket客户端发送过来的参数列表。
args = readArgumentList();

descriptors = mSocket.getAncillaryFileDescriptors();
} catch (IOException ex) {
Log.w(TAG, "IOException on command socket " + ex.getMessage());
closeSocket();
return true;
}

if (args == null) {
// EOF reached.
closeSocket();
return true;
}

/** the stderr of the most recent request, if avail */
PrintStream newStderr = null;

if (descriptors != null && descriptors.length >= 3) {
newStderr = new PrintStream(
new FileOutputStream(descriptors[2]));
}

int pid = -1;
FileDescriptor childPipeFd = null;
FileDescriptor serverPipeFd = null;

try {
//【2】将 Socket 客户端传递过来的参数,解析成 Arguments 对象格式。
parsedArgs = new Arguments(args);

if (parsedArgs.abiListQuery) {
return handleAbiListQuery();
}

if (parsedArgs.permittedCapabilities != 0 || parsedArgs.effectiveCapabilities != 0) {
throw new ZygoteSecurityException("Client may not specify capabilities: " +
"permitted=0x" + Long.toHexString(parsedArgs.permittedCapabilities) +
", effective=0x" + Long.toHexString(parsedArgs.effectiveCapabilities));
}

applyUidSecurityPolicy(parsedArgs, peer);
applyInvokeWithSecurityPolicy(parsedArgs, peer);

applyDebuggerSystemProperty(parsedArgs);
applyInvokeWithSystemProperty(parsedArgs);

int[][] rlimits = null;

if (parsedArgs.rlimits != null) {
rlimits = parsedArgs.rlimits.toArray(intArray2d);
}

if (parsedArgs.invokeWith != null) {
FileDescriptor[] pipeFds = Os.pipe2(O_CLOEXEC);
childPipeFd = pipeFds[1];
serverPipeFd = pipeFds[0];
Os.fcntlInt(childPipeFd, F_SETFD, 0);
}

int [] fdsToClose = { -1, -1 };

FileDescriptor fd = mSocket.getFileDescriptor();

if (fd != null) {
fdsToClose[0] = fd.getInt$();
}

fd = ZygoteInit.getServerSocketFileDescriptor();

if (fd != null) {
fdsToClose[1] = fd.getInt$();
}

fd = null;

//【3.3.1】这边是 Zygote 处理传入的参数,fork 子进程,返回 2 次
// 分别进入父进程 Zygote 和新子进程中去!
pid = Zygote.forkAndSpecialize(parsedArgs.uid, parsedArgs.gid, parsedArgs.gids,
parsedArgs.debugFlags, rlimits, parsedArgs.mountExternal, parsedArgs.seInfo,
parsedArgs.niceName, fdsToClose, parsedArgs.instructionSet,
parsedArgs.appDataDir);

} catch (ErrnoException ex) {
logAndPrintError(newStderr, "Exception creating pipe", ex);
} catch (IllegalArgumentException ex) {
logAndPrintError(newStderr, "Invalid zygote arguments", ex);
} catch (ZygoteSecurityException ex) {
logAndPrintError(newStderr,
"Zygote security policy prevents request: ", ex);
}

try {
//【4】fork一次,会返回两次,如果返回的是 0,表示当前是是在子进程中,
// 如果返回值 > 0,那当前就是在父进程中!
if (pid == 0) {
//【4.1】pid 为 0,在子进程中处理!
IoUtils.closeQuietly(serverPipeFd);
serverPipeFd = null;

//【3.3.2】子进程执行,这里会抛出异常:MethodAndArgsCaller!
handleChildProc(parsedArgs, descriptors, childPipeFd, newStderr);
return true;

} else {
//【4.2】pid 大于 0,在父进程!
IoUtils.closeQuietly(childPipeFd);
childPipeFd = null;

//【3.3.3】父进程 Zygote 执行!
return handleParentProc(pid, descriptors, serverPipeFd, parsedArgs);
}
} finally {
IoUtils.closeQuietly(childPipeFd);
IoUtils.closeQuietly(serverPipeFd);
}
}

3.3.1 Zygote.forkAndSpecialize - fork 子进程核心阶段

这里开始 Fork 子进程!!

1
2
3
4
5
6
7
8
9
10
11
12
13
14
15
16
17
18
19
20
21
22
public static int forkAndSpecialize(int uid, int gid, int[] gids, int debugFlags,
int[][] rlimits, int mountExternal, String seInfo, String niceName, int[] fdsToClose,
String instructionSet, String appDataDir) {

//【3.3.1.1】fork 前的准备工作
VM_HOOKS.preFork();

//【3.3.1.2】这里是 fork 子进程,调用了一个 naitve 方法。这个方法会返回 2 次!
int pid = nativeForkAndSpecialize(
uid, gid, gids, debugFlags, rlimits, mountExternal, seInfo, niceName, fdsToClose,
instructionSet, appDataDir);

if (pid == 0) {
// 监控子进程,直到 handleChildProc 结束!
Trace.setTracingEnabled(true);
Trace.traceBegin(Trace.TRACE_TAG_ACTIVITY_MANAGER, "PostFork");
}

//【3.3.1.3】fork 结束后的相关操作!
VM_HOOKS.postForkCommon();
return pid;
}

这里有一变量:

1
private static final ZygoteHooks VM_HOOKS = new ZygoteHooks();

nativeForkAndSpecialize 方法会返回 2 次,一次 pid 为 0,表示是在子进程中;一次 pid 大于 0,表示是在 Zygote 进程中,意味着,postForkCommon 会执行 2 次!

接着来看:

3.3.1.1 ZygoteHooks.preFork - fork 准备工作

ZygoteHooks 的源码位于:D:\google\libcore\dalvik\src\main\java\dalvik\system\ZygoteHooks.java

1
2
3
4
5
6
7
8
public void preFork() {
//【3.3.1.1.1】停止 4 个 Daemon 子线程
Daemons.stop();
//【3.3.1.1.2】等待所有子线程结束
waitUntilAllThreadsStopped();
//【3.3.1.1.3】完成 gc 堆的初始化工作
token = nativePreFork();
}
3.3.1.1.1 Daemons.stop
1
2
3
4
5
6
public static void stop() {
HeapTaskDaemon.INSTANCE.stop(); // Java堆整理线程
ReferenceQueueDaemon.INSTANCE.stop(); // 引用队列线程
FinalizerDaemon.INSTANCE.stop(); // 析构线程
FinalizerWatchdogDaemon.INSTANCE.stop(); // 析构监控线程
}

Zygote 是有 4 个子线程的,这里是需要停止这四个子线程,为 fork 操作空出资源来!

此处守护线程 Stop 方式是先调用目标线程 interrrupt 方法,然后再调用目标线程 join 方法,等待线程执行完成。

3.3.1.1.2 ZygoteHooks.waitUntilAllThreadsStopped
1
2
3
4
5
6
7
8
private static void waitUntilAllThreadsStopped() {
File tasks = new File("/proc/self/task");
//【1】判断 "/proc/self/task" 这个文件的长度!!
while (tasks.list().length > 1) {
//【2】调用 yield 方法,出让 cpu!
Thread.yield();
}
}
3.3.1.1.3 ZygoteHooks.nativePreFork

nativePreFork 通过 JNI 最终调用的是 dalvik_system_ZygoteHooks.cc 中的 ZygoteHooks_nativePreFork() 方法,如下:

1
2
3
4
5
6
7
8
9
10
11
static jlong ZygoteHooks_nativePreFork(JNIEnv* env, jclass) {
Runtime* runtime = Runtime::Current();
CHECK(runtime->IsZygote()) << "runtime instance not started with -Xzygote";
//【3.3.1.1.3.1】运行时堆的初始化!
runtime->PreZygoteFork();
if (Trace::GetMethodTracingMode() != TracingMode::kTracingInactive) {
Trace::Pause();
}
//【1】将线程类型转换为 long 型并保存到 token,该过程是非安全的。
return reinterpret_cast<jlong>(ThreadForEnv(env));
}

可以看出:ZygoteHooks.preFork 方法主要的作用是:停止 Zygote 的停止这四个子线程,确保 fork 进程时,Zygote 是单线程的,同时初始化 gc 堆!!

ZygoteHooks_nativePreFork

3.3.1.1.3.1 Runtime:nativePreFork
1
2
3
4
void Runtime::PreZygoteFork() {
// 堆的初始化工作。这里是关于 art 虚拟机的,这里后面再说。
heap_->PreZygoteFork();
}

3.3.1.2 Zygote.nativeForkAndSpecialize - fork 子进程

调用这个方法 nativeForkAndSpecialize 来进行 fork 进程!

1
2
3
native private static int nativeForkAndSpecialize(int uid, int gid, int[] gids,int debugFlags,
int[][] rlimits, int mountExternal, String seInfo, String niceName, int[] fdsToClose,
String instructionSet, String appDataDir);

这是一个本地方法,最后调用的是 com_android_internal_os_Zygote_nativeForkAndSpecialize 方法,位于 frameworks\base\core\jni\com_android_internal_os_Zygote.cpp 中:

1
2
3
4
5
6
7
8
9
10
11
12
13
14
15
16
17
18
19
20
21
22
23
24
25
26
27
28
29
30
31
32
33
34
35
36
37
38
39
40
41
42
43
static jint com_android_internal_os_Zygote_nativeForkAndSpecialize(
JNIEnv* env, jclass, jint uid, jint gid, jintArray gids,
jint debug_flags, jobjectArray rlimits,
jint mount_external, jstring se_info, jstring se_name,
jintArray fdsToClose, jstring instructionSet, jstring appDataDir) {
jlong capabilities = 0;

//【1】这里对子进程的 uid 如果是 AID_BLUETOOTH 的情况做了处理!
// 给你额外增加了一些权限和功能!!
if (multiuser_get_app_id(uid) == AID_BLUETOOTH) {
capabilities |= (1LL << CAP_WAKE_ALARM);
capabilities |= (1LL << CAP_NET_RAW);
capabilities |= (1LL << CAP_NET_BIND_SERVICE);
}

//【2】如果子进程的 gid 是 AID_WAKELOCK,我们会授予他 CAP_BLOCK_SUSPEND 的权限!
bool gid_wakelock_found = false;
if (gid == AID_WAKELOCK) {
gid_wakelock_found = true;

} else if (gids != NULL) {
//【3】如果子进程的 gids 中有 AID_WAKELOCK,会授予他 CAP_BLOCK_SUSPEND 的权限!
jsize gids_num = env->GetArrayLength(gids);
ScopedIntArrayRO ar(env, gids);
if (ar.get() == NULL) {
RuntimeAbort(env, __LINE__, "Bad gids array");
}
for (int i = 0; i < gids_num; i++) {
if (ar[i] == AID_WAKELOCK) {
gid_wakelock_found = true;
break;
}
}
}
if (gid_wakelock_found) {
capabilities |= (1LL << CAP_BLOCK_SUSPEND);
}

//【next】继续调用 ForkAndSpecializeCommon 方法!
return ForkAndSpecializeCommon(env, uid, gid, gids, debug_flags,
rlimits, capabilities, capabilities, mount_external, se_info,
se_name, false, fdsToClose, instructionSet, appDataDir);
}

接着,继续调用:ForkAndSpecializeCommon 方法,继续 fork!

1
2
3
4
5
6
7
8
9
10
11
12
13
14
15
16
17
18
19
20
21
22
23
24
25
26
27
28
29
30
31
32
33
34
35
36
37
38
39
40
41
42
43
44
45
46
47
48
49
50
51
52
53
54
55
56
57
58
59
60
61
62
63
64
65
66
67
68
69
70
71
72
73
74
75
76
77
78
79
80
81
82
83
84
85
86
87
88
89
90
91
92
93
94
95
96
97
98
99
100
101
102
103
104
105
106
107
108
109
110
111
112
113
114
115
116
117
118
119
120
121
122
123
124
125
126
127
128
129
130
131
132
133
134
135
136
137
138
139
140
141
142
143
144
145
146
147
148
149
150
151
152
153
154
155
156
157
158
159
160
161
162
163
164
165
166
167
168
169
170
171
172
173
174
175
176
177
178
179
180
181
182
183
184
185
186
187
188
189
190
191
192
193
194
195
196
197
198
199
200
201
static pid_t ForkAndSpecializeCommon(JNIEnv* env, uid_t uid, gid_t gid, jintArray javaGids,
jint debug_flags, jobjectArray javaRlimits,
jlong permittedCapabilities, jlong effectiveCapabilities,
jint mount_external,
jstring java_se_info, jstring java_se_name,
bool is_system_server, jintArray fdsToClose,
jstring instructionSet, jstring dataDir) {
//【1】设置子进程的 signal 信号处理函数!
SetSigChldHandler();

#ifdef ENABLE_SCHED_BOOST
SetForkLoad(true);
#endif

sigset_t sigchld;
sigemptyset(&sigchld);
sigaddset(&sigchld, SIGCHLD);

// 调用 sigprocmask() 来暂时屏蔽/阻塞 SIGCHLD 信号,不然 SIGCHLD 信号会产生log,而被我们关闭掉的
// logging 文件描述符会对这个信号进行响应,所以会报错
// 到这里,zygote 进程就只有一个线程了!
if (sigprocmask(SIG_BLOCK, &sigchld, nullptr) == -1) {
ALOGE("sigprocmask(SIG_SETMASK, { SIGCHLD }) failed: %s", strerror(errno));
RuntimeAbort(env, __LINE__, "Call to sigprocmask(SIG_BLOCK, { SIGCHLD }) failed.");
}

// 关闭 log 系统
__android_log_close();

// 如果是第一次 fork 进程,那么会创建 open FD table;否则,只需要检查 open FD 是否变化!
if (gOpenFdTable == NULL) {
gOpenFdTable = FileDescriptorTable::Create();
if (gOpenFdTable == NULL) {
RuntimeAbort(env, __LINE__, "Unable to construct file descriptor table.");
}
} else if (!gOpenFdTable->Restat()) {
RuntimeAbort(env, __LINE__, "Unable to restat file descriptor table.");
}

//【2】这里是调用了 Linux 的 fork 方法,fork 进程,返回 2 次!
pid_t pid = fork();

//【3】根据 fork 的返回值,进行不同的处理!
if (pid == 0) {
//【3.1】pid 返回 0,进入子进程中执行!
gMallocLeakZygoteChild = 1;

// 清理掉那些需要被立刻关闭的文件描述符
DetachDescriptors(env, fdsToClose);

// Re-open all remaining open file descriptors so that they aren't shared
// with the zygote across a fork.
if (!gOpenFdTable->ReopenOrDetach()) {
RuntimeAbort(env, __LINE__, "Unable to reopen whitelisted descriptors.");
}
if (sigprocmask(SIG_UNBLOCK, &sigchld, nullptr) == -1) {
ALOGE("sigprocmask(SIG_SETMASK, { SIGCHLD }) failed: %s", strerror(errno));
RuntimeAbort(env, __LINE__, "Call to sigprocmask(SIG_UNBLOCK, { SIGCHLD }) failed.");
}

//【3.1.1】非 root,禁止动态改变进程权限!
if (uid != 0) {
EnableKeepCapabilities(env);
}
//【3.1.2】取消进程已有的 Capabilities 权限
DropCapabilitiesBoundingSet(env);

// 判断是否使用 native bridge,这个模块基本上就是为了在JNI调用时进行动态转码用的!
// 要使用 native bridge,至少要满足一下条件:
// 1、不是 SystemServer 进程,NativeBridge 主要是用来解决 JNI 函数的兼容性问题的,SystemServer 是 fork 自 Zygote,
// 但是它属于系统的一部分,肯定是根据所在平台而编译的,因此肯定不需要转指令集;
// 2、NativeBridge 已经准备好了;
// 3、dataDir 也不能为 null;
bool use_native_bridge = !is_system_server && (instructionSet != NULL)
&& android::NativeBridgeAvailable();
if (use_native_bridge) {
ScopedUtfChars isa_string(env, instructionSet);
use_native_bridge = android::NeedsNativeBridge(isa_string.c_str());
}
if (use_native_bridge && dataDir == NULL) {.
use_native_bridge = false;
ALOGW("Native bridge will not be used because dataDir == NULL.");
}

if (!MountEmulatedStorage(uid, mount_external, use_native_bridge)) {
ALOGW("Failed to mount emulated storage: %s", strerror(errno));
if (errno == ENOTCONN || errno == EROFS) {
} else {
RuntimeAbort(env, __LINE__, "Cannot continue without emulated storage");
}
}

//【3.1.3】如果当前 fork 的子进程不是 system server 而是普通的应用进程的话,我们会创建进程组!
if (!is_system_server) {
int rc = createProcessGroup(uid, getpid());
if (rc != 0) {
if (rc == -EROFS) {
ALOGW("createProcessGroup failed, kernel missing CONFIG_CGROUP_CPUACCT?");
} else {
ALOGE("createProcessGroup(%d, %d) failed: %s", uid, pid, strerror(-rc));
}
}
}
//【3.1.4】设置进程所属的 group!
SetGids(env, javaGids);
//【3.1.5】设置资源 limit!
SetRLimits(env, javaRlimits);

if (use_native_bridge) {
ScopedUtfChars isa_string(env, instructionSet);
ScopedUtfChars data_dir(env, dataDir);
android::PreInitializeNativeBridge(data_dir.c_str(), isa_string.c_str());
}
//【3.1.6】设置真实的、有效的和保存过的 gid
int rc = setresgid(gid, gid, gid);
if (rc == -1) {
ALOGE("setresgid(%d) failed: %s", gid, strerror(errno));
RuntimeAbort(env, __LINE__, "setresgid failed");
}
//【3.1.7】设置真实的、有效的和保存过的 uid
rc = setresuid(uid, uid, uid);
if (rc == -1) {
ALOGE("setresuid(%d) failed: %s", uid, strerror(errno));
RuntimeAbort(env, __LINE__, "setresuid failed");
}

if (NeedsNoRandomizeWorkaround()) {
// Work around ARM kernel ASLR lossage (http://b/5817320).
int old_personality = personality(0xffffffff);
int new_personality = personality(old_personality | ADDR_NO_RANDOMIZE);
if (new_personality == -1) {
ALOGW("personality(%d) failed: %s", new_personality, strerror(errno));
}
}
//【3.1.8】设置新的 capabilities 权限
SetCapabilities(env, permittedCapabilities, effectiveCapabilities);
//【3.1.9】设置调度策略
SetSchedulerPolicy(env);

// 获得进程的主线程的 nice name
const char* se_info_c_str = NULL;
ScopedUtfChars* se_info = NULL;
if (java_se_info != NULL) {
se_info = new ScopedUtfChars(env, java_se_info);
se_info_c_str = se_info->c_str();
if (se_info_c_str == NULL) {
RuntimeAbort(env, __LINE__, "se_info_c_str == NULL");
}
}
const char* se_name_c_str = NULL;
ScopedUtfChars* se_name = NULL;
if (java_se_name != NULL) {
se_name = new ScopedUtfChars(env, java_se_name);
se_name_c_str = se_name->c_str();
if (se_name_c_str == NULL) {
RuntimeAbort(env, __LINE__, "se_name_c_str == NULL");
}
}
//【3.1.10】设置进程 selinux 上下文
rc = selinux_android_setcontext(uid, is_system_server, se_info_c_str, se_name_c_str);
if (rc == -1) {
ALOGE("selinux_android_setcontext(%d, %d, \"%s\", \"%s\") failed", uid,
is_system_server, se_info_c_str, se_name_c_str);
RuntimeAbort(env, __LINE__, "selinux_android_setcontext failed");
}

//【3.1.11】设置进程的主线程的 nice name,用于方便调试!
if (se_info_c_str == NULL && is_system_server) {
se_name_c_str = "system_server";
}
if (se_info_c_str != NULL) {
SetThreadName(se_name_c_str);
}

delete se_info;
delete se_name;
// 将子进程的 SIGCHLD 信号的处理函数修改回系统默认函数
UnsetSigChldHandler();

//【*3.3.1.2.1】JNI 调,相当于 zygote.callPostForkChildHooks(),在子进程中执行
env->CallStaticVoidMethod(gZygoteClass, gCallPostForkChildHooks, debug_flags,
is_system_server, instructionSet);
if (env->ExceptionCheck()) {
RuntimeAbort(env, __LINE__, "Error calling post fork hooks.");
}
} else if (pid > 0) {
//【3.2】pid 大于 0 ,在父进程中执行,返回的 pid 的子进程的 pid!

#ifdef ENABLE_SCHED_BOOST
// unset scheduler knob
SetForkLoad(false);
#endif

// 调用 sigprocmask() 取消屏蔽/阻塞 SIGCHLD 信号
if (sigprocmask(SIG_UNBLOCK, &sigchld, nullptr) == -1) {
ALOGE("sigprocmask(SIG_SETMASK, { SIGCHLD }) failed: %s", strerror(errno));
RuntimeAbort(env, __LINE__, "Call to sigprocmask(SIG_UNBLOCK, { SIGCHLD }) failed.");
}
}
return pid;
}

Zygote 进程是所有 Android 进程的母体,包括 system_server 进程以及 App 进程都是由 Zygote 进程孵化而来。

zygote 利用 fork() 方法生成新进程,对于新进程 A 复用 Zygote 进程本身的资源,再加上新进程 A 相关的资源,构成新的应用进程 A 。

关于 native bridge,我没有过多研究,大家可以看看这个博客:

https://blog.csdn.net/sinat_38172893/article/details/73274591

3.3.1.2.1 Zygote.CallPostForkChildHooks - 子进程调用

上面通过反射再次调用了 Zygote 的 CallPostForkChildHooks 方法:

1
2
3
4
5
private static void callPostForkChildHooks(int debugFlags, boolean isSystemServer,
String instructionSet) {
//【3.3.1.2.1.1】继续调用!
VM_HOOKS.postForkChild(debugFlags, isSystemServer, instructionSet);
}

这边有调用了 ZygoteHooks 的 postForkChild 方法:

3.3.1.2.1.1 ZygoteHooks.postForkChild

这个方法是在 Zygote fork 出的子进程中调用的!!

1
2
3
4
5
6
public void postForkChild(int debugFlags, boolean isSystemServer, String instructionSet) {
//【3.3.1.2.1.2】继续调用!
nativePostForkChild(token, debugFlags, isSystemServer, instructionSet);

Math.setRandomSeedInternal(System.currentTimeMillis());
}

我们可以看到,这里传入了一个 token,这是是一个 long 型的值,用来保存线程的类型,在前面:

1
3.3.1.1.3 ZygoteHooks.nativePreFork

nativePreFork 会将 Zygote 主线程的类型转换为 long 型,保存到 ZygoteHooks.token 中!

3.3.1.2.1.2 ZygoteHooks.nativePostForkChild

我们继续看:

1
2
private static native void nativePostForkChild(long token, int debugFlags,
boolean isSystemServer, String instructionSet);

这是一个 navtive 方法,最终调用 “\art\runtime\native\dalvik_system_ZygoteHooks.cc” 的 ZygoteHooks_nativePostForkChild 方法:

1
2
3
4
5
6
7
8
9
10
11
12
13
14
15
16
17
18
19
20
21
22
23
24
25
26
27
28
29
30
31
32
33
34
35
36
37
38
39
40
static void ZygoteHooks_nativePostForkChild(JNIEnv* env,
jclass,
jlong token,
jint debug_flags,
jboolean is_system_server,
jstring instruction_set) {

Thread* thread = reinterpret_cast<Thread*>(token);
// Our system thread ID, etc, has changed so reset Thread state.

//【1】初始化子进程的主线程!
// 该方法主要是获得主线程的 tid!
thread->InitAfterFork();

EnableDebugFeatures(debug_flags);

// Update tracing.
if (Trace::GetMethodTracingMode() != TracingMode::kTracingInactive) {
... ... ... ... // 这里是和 tracing 相关,不是重点!
}

if (instruction_set != nullptr && !is_system_server) {
//【2.1】非 SystemServer 子进程,走这里!
ScopedUtfChars isa_string(env, instruction_set);
InstructionSet isa = GetInstructionSetFromString(isa_string.c_str());
Runtime::NativeBridgeAction action = Runtime::NativeBridgeAction::kUnload;
if (isa != kNone && isa != kRuntimeISA) {
action = Runtime::NativeBridgeAction::kInitialize;
}
//【3.3.1.2.1.3】调用 Runtime 的 InitNonZygoteOrPostFork 方法!!
Runtime::Current()->InitNonZygoteOrPostFork(
env, is_system_server, action, isa_string.c_str());

} else {
//【2.2】SystemServer 进程,走这里,请看开机流程相关的内容!
Runtime::Current()->InitNonZygoteOrPostFork(
env, is_system_server, Runtime::NativeBridgeAction::kUnload, nullptr);

}
}

这里我们主要分析下,非 SystemServer 子进程的逻辑处理,对于 SystemServer 进程的处理,请看开机启动流程文章内容!

3.3.1.2.1.3 Runtime.InitNonZygoteOrPostFork
1
2
3
4
5
6
7
8
9
10
11
12
13
14
15
16
17
18
19
20
21
22
23
24
25
26
27
28
29
30
31
32
33
34
35
36
37
38
void Runtime::InitNonZygoteOrPostFork(
JNIEnv* env, bool is_system_server, NativeBridgeAction action, const char* isa) {
is_zygote_ = false;

if (is_native_bridge_loaded_) { // native bridge 相关逻辑!
switch (action) {
case NativeBridgeAction::kUnload:
UnloadNativeBridge();
is_native_bridge_loaded_ = false;
break;

case NativeBridgeAction::kInitialize:
InitializeNativeBridge(env, isa);
break;
}
}

// 创建堆处理的线程池!
heap_->CreateThreadPool();
// Reset the gc performance data at zygote fork so that the GCs
// before fork aren't attributed to an app.
heap_->ResetGcPerformanceInfo();

// 非 SystemServer 进程会进入这里!
if (!is_system_server &&
!safe_mode_ &&
(jit_options_->UseJitCompilation() || jit_options_->GetSaveProfilingInfo()) &&
jit_.get() == nullptr) {
// 创建 JIT!
CreateJit();
}

// 设置信号处理函数!
StartSignalCatcher();

// 启动 JDWP 线程,当命令行 debuger 的 flags 指定"suspend=y"时,则暂停 runtime
Dbg::StartJdwp();
}

3.3.1.3 ZygoteHooks.postForkCommon - fork 结束

这个方法会在父进程 Zygote 和子进程中各调用一次,也就是说,在父进程 Zygote 中是恢复 4 个 Daemon 线程,而在子进程中,是启动 4 个 Daemon 线程!

1
2
3
4
public void postForkCommon() {
//【3.3.1.3.1】启动 Deamons 线程!
Daemons.start();
}
3.3.1.3.1 Daemons.start

ZygoteHooks.postForkCommon 方法很简单,启动 4 个 Daemon 线程,java堆整理,引用队列,以及析构线程。

1
2
3
4
5
6
public static void start() {
ReferenceQueueDaemon.INSTANCE.start();
FinalizerDaemon.INSTANCE.start();
FinalizerWatchdogDaemon.INSTANCE.start();
HeapTaskDaemon.INSTANCE.start();
}

3.3.1.4 阶段总结

首先来看看调用函数流程:

1
2
3
4
5
6
7
8
9
10
11
12
13
14
15
16
17
18
Zygote.forkAndSpecialize
ZygoteHooks.preFork // 停掉 zygote 的子线程,为 fork 做准备!
Daemons.stop
ZygoteHooks.nativePreFork
dalvik_system_ZygoteHooks.ZygoteHooks_nativePreFork
Runtime::PreZygoteFork
heap_->PreZygoteFork()

Zygote.nativeForkAndSpecialize // fork 阶段,该这个方法会返回 2 次!
com_android_internal_os_Zygote.ForkAndSpecializeCommon
fork()
Zygote.callPostForkChildHooks
ZygoteHooks.postForkChild
dalvik_system_ZygoteHooks.nativePostForkChild
Runtime::InitNonZygoteOrPostFork

ZygoteHooks.postForkCommon // 启动 4 个 Deamon 子线程!
Daemons.start

这个流程很清楚啦,不都说了啦,嘿嘿嘿!

3.3.2 ZygoteConncection.handleChildProc - 子进程处理

我们知道,Zygote.forkAndSpecialize 会返回 2 次,当返回值为 0 时,进入子进程:

1
2
3
4
5
6
7
8
9
10
11
12
13
14
15
16
17
18
19
20
21
22
23
24
25
26
27
28
29
30
31
32
33
34
35
36
37
38
39
40
41
42
private void handleChildProc(Arguments parsedArgs,
FileDescriptor[] descriptors, FileDescriptor pipeFd, PrintStream newStderr)
throws ZygoteInit.MethodAndArgsCaller { // 抛出异常!

//【1】进程创建完毕,关闭 Socket 连接!
closeSocket();
ZygoteInit.closeServerSocket();

if (descriptors != null) {
try {
Os.dup2(descriptors[0], STDIN_FILENO);
Os.dup2(descriptors[1], STDOUT_FILENO);
Os.dup2(descriptors[2], STDERR_FILENO);

for (FileDescriptor fd: descriptors) {
IoUtils.closeQuietly(fd);
}
newStderr = System.err;
} catch (ErrnoException ex) {
Log.e(TAG, "Error reopening stdio", ex);
}
}

if (parsedArgs.niceName != null) {
//【2】设置进程的 niceName
Process.setArgV0(parsedArgs.niceName);
}

// End of the postFork event.
Trace.traceEnd(Trace.TRACE_TAG_ACTIVITY_MANAGER);

if (parsedArgs.invokeWith != null) {
WrapperInit.execApplication(parsedArgs.invokeWith,
parsedArgs.niceName, parsedArgs.targetSdkVersion,
VMRuntime.getCurrentInstructionSet(),
pipeFd, parsedArgs.remainingArgs);
} else {
//【3.3.2.1】看前面的参数传递,parsedArgs.invokeWith 为 null,进入这个分支!
RuntimeInit.zygoteInit(parsedArgs.targetSdkVersion,
parsedArgs.remainingArgs, null /* classLoader */);
}
}

我们继续看:

3.3.2.1 RuntimeInit.zygoteInit

1
2
3
4
5
6
7
8
9
10
11
12
13
public static final void zygoteInit(int targetSdkVersion, String[] argv, ClassLoader classLoader)
throws ZygoteInit.MethodAndArgsCaller {
if (DEBUG) Slog.d(TAG, "RuntimeInit: Starting application from zygote");

Trace.traceBegin(Trace.TRACE_TAG_ACTIVITY_MANAGER, "RuntimeInit");
redirectLogStreams();
//【3.3.2.1.1】进程的通用初始化
commonInit();
//【3.3.2.1.2】本地的 Zygote 初始化
nativeZygoteInit();
//【3.3.2.1.3】应用初始化!
applicationInit(targetSdkVersion, argv, classLoader);
}

啦啦啦啦啦

3.3.2.1.1 RuntimeInit.commonInit - 进程通用初始化

进程的通用初始化:

1
2
3
4
5
6
7
8
9
10
11
12
13
14
15
16
17
18
19
20
21
22
23
24
25
26
27
28
29
30
31
32
33
34
35
36
private static final void commonInit() {
if (DEBUG) Slog.d(TAG, "Entered RuntimeInit!");

//【1】设置该进程中所有线程的默认 crash handler!!
Thread.setDefaultUncaughtExceptionHandler(new UncaughtHandler());

//【2】设置时区!
TimezoneGetter.setInstance(new TimezoneGetter() {
@Override
public String getId() {
return SystemProperties.get("persist.sys.timezone");
}
});
TimeZone.setDefault(null);

//【3】重置 LogManager
LogManager.getLogManager().reset();
new AndroidConfig();

//【4】设置默认的 http 用户代理,这个是 HttpURLConnection 必须的!
String userAgent = getDefaultUserAgent();
System.setProperty("http.agent", userAgent);

//【5】安装网络
NetworkManagementSocketTagger.install();

//【6】设置模拟器相关参数!
String trace = SystemProperties.get("ro.kernel.android.tracing");
if (trace.equals("1")) {
Slog.i(TAG, "NOTE: emulator trace profiling enabled");
Debug.enableEmulatorTraceOutput();
}

//【7】表示初始化完成!
initialized = true;
}
3.3.2.1.2 RuntimeInit.nativeZygoteInit - 进程本地初始化

nativeZygoteInit 是一个 native 方法:

1
private static final native void nativeZygoteInit();

显然这是一个 native 方法,对应的 native 方法为 com_android_internal_os_RuntimeInit_nativeZygoteInit 方法,位于 AndroidRuntime.cpp 文件中:

1
2
3
4
5
static void com_android_internal_os_RuntimeInit_nativeZygoteInit(JNIEnv* env, jobject clazz)
{
//【1】调用了运行时的 onZygoteInit 方法!
gCurRuntime->onZygoteInit();
}

接着,进入 App_main.cpp 文件中:

1
2
3
4
5
6
7
8
9
virtual void onZygoteInit()
{
//【1】获得当前进程的 ProcessState 对象!!
sp<ProcessState> proc = ProcessState::self();
ALOGV("App process: starting thread pool.\n");

//【2】创建一个新的 Binder 线程,不断的 talkWithDriver!!
proc->startThreadPool();
}

这里的 ProcessState 对象是一个单例模式,他会打开 /dev/binder 驱动设备,分配内核空间,然后 start 一个 binder 线程,不断地 talkWithDriver,用于进行进程间通信!

3.3.2.1.3 RuntimeInit.applicationInit - 初始化进程的 Application 对象

这里很重要,初始化进程的 Application 对象!

1
2
3
4
5
6
7
8
9
10
11
12
13
14
15
16
17
18
19
20
21
22
23
24
25
26
27
28
29
private static void applicationInit(int targetSdkVersion, String[] argv, ClassLoader classLoader)
throws ZygoteInit.MethodAndArgsCaller {
// If the application calls System.exit(), terminate the process
// immediately without running any shutdown hooks. It is not possible to
// shutdown an Android application gracefully. Among other things, the
// Android runtime shutdown hooks close the Binder driver, which can cause
// leftover running threads to crash before the process actually exits.
nativeSetExitWithoutCleanup(true);

//【1】设置 java 堆内存的利用率为 75%,以及目标 sdk 平台的版本!
VMRuntime.getRuntime().setTargetHeapUtilization(0.75f);
VMRuntime.getRuntime().setTargetSdkVersion(targetSdkVersion);

final Arguments args;
try {
//【2】解析参数!
args = new Arguments(argv);

} catch (IllegalArgumentException ex) {
Slog.e(TAG, ex.getMessage());
return;
}

//【3】结束对子进程的监控!
Trace.traceEnd(Trace.TRACE_TAG_ACTIVITY_MANAGER);

//【3.3.2.1.3.1】进一步解析参数,执行 startClass 类的 main 方法!!
invokeStaticMain(args.startClass, args.startArgs, classLoader);
}

这里有人要问了,这个 startClass 是什么类,此处 args.startClass 为 “android.app.ActivityThread”。

3.3.2.1.3.1 RuntimeInit.invokeStaticMain
1
2
3
4
5
6
7
8
9
10
11
12
13
14
15
16
17
18
19
20
21
22
23
24
25
26
27
28
29
30
31
32
33
34
35
private static void invokeStaticMain(String className, String[] argv, ClassLoader classLoader)
throws ZygoteInit.MethodAndArgsCaller {
Class<?> cl;

try {
//【1】反射获得 ActivityThread 类!
cl = Class.forName(className, true, classLoader);
} catch (ClassNotFoundException ex) {
throw new RuntimeException(
"Missing class when invoking static main " + className,
ex);
}

Method m;
try {
//【2】获得 ActivityThread 的 main 方法!
m = cl.getMethod("main", new Class[] { String[].class });

} catch (NoSuchMethodException ex) {
throw new RuntimeException(
"Missing static main on " + className, ex);
} catch (SecurityException ex) {
throw new RuntimeException(
"Problem getting static main on " + className, ex);
}

int modifiers = m.getModifiers();
if (! (Modifier.isStatic(modifiers) && Modifier.isPublic(modifiers))) {
throw new RuntimeException(
"Main method is not public and static on " + className);
}

//【3.4】这个地方抛出了 MethodAndArgsCaller 异常!!!
throw new ZygoteInit.MethodAndArgsCaller(m, argv);
}

这里通过反射,获得了 ActivityThread.main 方法,然后创建了一个异常:MethodAndArgsCaller,抛了出去!

这个异常会通过 ZygoteConnection.runOnce 方法传递出去,进入了 ZygoteInit.main 方法,那里会对这个异常进行 catch 并处理!

3.3.3 ZygoteConncection.handleParentProc - 父进程处理

当 fork 的返回值大于 0,那就进入父进程 Zygote,返回 pid 的值是子进程的进程值:

1
2
3
4
5
6
7
8
9
10
11
12
13
14
15
16
17
18
19
20
21
22
23
24
25
26
27
28
29
30
31
32
33
34
35
36
37
38
39
40
41
42
43
44
45
46
47
48
49
50
51
52
53
54
55
56
57
58
59
60
private boolean handleParentProc(int pid,
FileDescriptor[] descriptors, FileDescriptor pipeFd, Arguments parsedArgs) {

//【1】判断一下返回值,若大于 0,说明 fork 成功,
// 设置子进程的 pgid!
if (pid > 0) {
//【*3.3.3.1】设置进程的 pgid!
setChildPgid(pid);
}

if (descriptors != null) {
for (FileDescriptor fd: descriptors) {
IoUtils.closeQuietly(fd);
}
}

boolean usingWrapper = false;
if (pipeFd != null && pid > 0) {
DataInputStream is = new DataInputStream(new FileInputStream(pipeFd));
int innerPid = -1;
try {
innerPid = is.readInt();
} catch (IOException ex) {
Log.w(TAG, "Error reading pid from wrapped process, child may have died", ex);
} finally {
try {
is.close();
} catch (IOException ex) {
}
}

// Ensure that the pid reported by the wrapped process is either the
// child process that we forked, or a descendant of it.
if (innerPid > 0) {
int parentPid = innerPid;
while (parentPid > 0 && parentPid != pid) {
parentPid = Process.getParentPid(parentPid);
}
if (parentPid > 0) {
Log.i(TAG, "Wrapped process has pid " + innerPid);
pid = innerPid;
usingWrapper = true;
} else {
Log.w(TAG, "Wrapped process reported a pid that is not a child of "
+ "the process that we forked: childPid=" + pid
+ " innerPid=" + innerPid);
}
}
}

try {
mSocketOutStream.writeInt(pid);
mSocketOutStream.writeBoolean(usingWrapper);
} catch (IOException ex) {
Log.e(TAG, "Error writing to command socket", ex);
return true;
}

return false;
}

3.3.3.1 setChildPgid

设置 fork 出的进程的 pgid:

1
2
3
4
5
6
7
8
9
10
11
12
13
private void setChildPgid(int pid) {
// Try to move the new child into the peer's process group.
try {
Os.setpgid(pid, Os.getpgid(peer.getPid()));
} catch (ErrnoException ex) {
// This exception is expected in the case where
// the peer is not in our session
// TODO get rid of this log message in the case where
// getsid(0) != getsid(peer.getPid())
Log.i(TAG, "Zygote: setpgid failed. This is "
+ "normal if peer is not in our session");
}
}

3.4 MethodAndArgsCaller.run - 处理异常

MethodAndArgsCaller 类位于 ZygoteInit.java 中:

1
2
3
4
5
6
7
8
9
10
11
12
13
14
15
16
17
18
19
20
21
22
23
24
25
26
27
28
29
30
public static class MethodAndArgsCaller extends Exception
implements Runnable {
/** method to call */
private final Method mMethod;

/** argument array */
private final String[] mArgs;

public MethodAndArgsCaller(Method method, String[] args) {
mMethod = method;
mArgs = args;
}

public void run() {
try {
//【1】执行进程的 ActivityThread.main 方法!!
mMethod.invoke(null, new Object[] { mArgs });
} catch (IllegalAccessException ex) {
throw new RuntimeException(ex);
} catch (InvocationTargetException ex) {
Throwable cause = ex.getCause();
if (cause instanceof RuntimeException) {
throw (RuntimeException) cause;
} else if (cause instanceof Error) {
throw (Error) cause;
}
throw new RuntimeException(ex);
}
}
}

这里就正式进入了新进程的 ActivityThread.main 方法,我们知道 ActivityThread.main 是应用程序进程的入口,到这里就将从 native 进入 java 层了,进行进一步的进程启动!
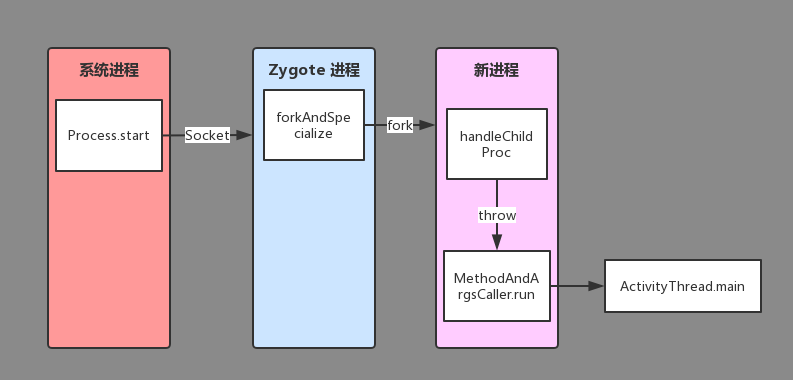
4 总结

4.1 通信方式总结

可以看出,主要有以下的两种通信方式:Binder 和 Socket !!

  • 启动方进程 -> SystemServer 进程: Binder
  • SystemServer 进程 -> Zygote 进程:Socket
  • Zygote 进程 -> 被启动进程:Socket

主要的流程图如下:

Process 创建流程图.png-19.8kB

4.2 调用流程总结

UML 序列图先埋坑,以后再填。。

[1]:

文章作者: Coolqi.Li
文章链接: https://lishuaiqi.top/2016/03/19/Process2-theCreateOfProcess/
版权声明: 本博客所有文章除特别声明外,均采用 CC BY-NC-SA 4.0 许可协议。转载请注明来自 Coolqi`s Blog
支付宝打赏
微信打赏