本篇文章基于 Android N(7.1.1)主要分析下 View 的加载 setContentView 的流程,以对 View 架构有更好的理解。
1 概述 setContentView 这个方法用于设置视图布局文件,在 Activity 的 onCreate 方法中,我们会通过该方法传入一个资源 id:
1
2
3
4
5
6
7
8
9
10
11
12
public class SplashActivity extends AppCompatActivity { private SplashHandler mSplashHandler; private static boolean sendMsg = true ; @Override protected void onCreate (@Nullable Bundle savedInstanceState) { super .onCreate(savedInstanceState); setContentView(R.layout.splash_layout); } }
下面我们来一起跟踪下 setContentView 的流程!
2 启动流程回顾 我们在之前分析 activity 启动的时候,应用进程的核心逻辑是在 ActivityThread 中,我们来去回顾下核心的代码:
2.1 ActivityThread 2.1.1 handleLaunchActivity 这个方法是在主线程的 H 中调用的,H 会收到来自 Stub 的 LAUNCH_ACTIVITY 的消息:
1
2
3
4
5
6
7
8
9
10
11
12
switch (msg.what) { case LAUNCH_ACTIVITY: { Trace.traceBegin(Trace.TRACE_TAG_ACTIVITY_MANAGER, "activityStart" ); final ActivityClientRecord r = (ActivityClientRecord) msg.obj; r.packageInfo = getPackageInfoNoCheck( r.activityInfo.applicationInfo, r.compatInfo); handleLaunchActivity(r, null , "LAUNCH_ACTIVITY" ); Trace.traceEnd(Trace.TRACE_TAG_ACTIVITY_MANAGER); } break ;
我们接着看:
1
2
3
4
5
6
7
8
9
10
private void handleLaunchActivity (ActivityClientRecord r, Intent customIntent) { ... ... ... WindowManagerGlobal.initialize(); Activity a = performLaunchActivity(r, customIntent); ... ... ... }
当 ActivityManagerService 接收到启动 Activity 的请求之后会通过 binder 跨进程通信,通知 activity 所在进程的 ApplicationThread 对象,然后执行:handleLauncherActivity方法;
会初始化一个 WindowManagerGlobal 实例 ;
调用 performLaunchActivity 方法 ;
继续看:
1
2
3
4
5
6
7
8
9
10
11
12
13
14
15
16
17
18
19
20
21
22
23
24
25
26
27
28
29
30
31
32
33
34
35
36
37
38
39
40
41
42
43
44
45
46
47
48
49
50
51
52
53
54
55
56
57
58
59
60
61
62
63
64
65
66
67
68
69
70
71
72
73
74
75
76
77
78
79
80
81
82
83
84
85
86
87
88
89
private Activity performLaunchActivity (ActivityClientRecord r, Intent customIntent) { ... ... ... Activity activity = null ; try { java.lang.ClassLoader cl = r.packageInfo.getClassLoader(); activity = mInstrumentation.newActivity( cl, component.getClassName(), r.intent); StrictMode.incrementExpectedActivityCount(activity.getClass()); r.intent.setExtrasClassLoader(cl); r.intent.prepareToEnterProcess(); if (r.state != null ) { r.state.setClassLoader(cl); } } catch (Exception e) { if (!mInstrumentation.onException(activity, e)) { throw new RuntimeException ( "Unable to instantiate activity " + component + ": " + e.toString(), e); } } try { Application app = r.packageInfo.makeApplication(false , mInstrumentation); ... ... ... if (activity != null ) { Context appContext = createBaseContextForActivity(r, activity); CharSequence title = r.activityInfo.loadLabel(appContext.getPackageManager()); Configuration config = new Configuration (mCompatConfiguration); if (r.overrideConfig != null ) { config.updateFrom(r.overrideConfig); } if (DEBUG_CONFIGURATION) Slog.v(TAG, "Launching activity " + r.activityInfo.name + " with config " + config); Window window = null ; if (r.mPendingRemoveWindow != null && r.mPreserveWindow) { window = r.mPendingRemoveWindow; r.mPendingRemoveWindow = null ; r.mPendingRemoveWindowManager = null ; } activity.attach(appContext, this , getInstrumentation(), r.token, r.ident, app, r.intent, r.activityInfo, title, r.parent, r.embeddedID, r.lastNonConfigurationInstances, config, r.referrer, r.voiceInteractor, window); if (customIntent != null ) { activity.mIntent = customIntent; } r.lastNonConfigurationInstances = null ; activity.mStartedActivity = false ; int theme = r.activityInfo.getThemeResource(); if (theme != 0 ) { activity.setTheme(theme); } activity.mCalled = false ; if (r.isPersistable()) { mInstrumentation.callActivityOnCreate(activity, r.state, r.persistentState); } else { mInstrumentation.callActivityOnCreate(activity, r.state); } ... ... ... } r.paused = true ; mActivities.put(r.token, r); } catch (SuperNotCalledException e) { throw e; } catch (Exception e) { if (!mInstrumentation.onException(activity, e)) { throw new RuntimeException ( "Unable to start activity " + component + ": " + e.toString(), e); } } return activity; }
反射来创建 Activity 实例;
执行 activity.attach 方法;
调用 onCreate 方法,在 onCreate 方法中,会调用 setContextView 方法;
这里涉及到 ActivityClientRecord.token 这个是怎么来的呢,我们简单回顾下:
1 2 3 4 5 6 app.thread.scheduleLaunchActivity(new Intent (r.intent), r.appToken, System.identityHashCode(r), r.info, new Configuration (mService.mConfiguration), new Configuration (task.mOverrideConfig), r.compat, r.launchedFromPackage, task.voiceInteractor, app.repProcState, r.icicle, r.persistentState, results, newIntents, !andResume, mService.isNextTransitionForward(), profilerInfo);
可以看到传入的是 ActivityRecord.appToken ,我们来看一个简单的调用栈:
1
2
3
4
ActivityManagerService.startActivity(IApplicationThread, ....) ->ActivityManagerService.startActivityAsUser(IApplicationThread, ...) -->ActivityStack.startActivityMayWait(IApplicationThread, ...) -->ActivityStack.startActivityLocked(IApplicationThread, ...)
这里会创建 ActivityRecord 实例,内部会创建一个 token 实例:
1
2
3
4
5
ActivityRecord(ActivityManagerService _service, ProcessRecord _caller, ...) { service = _service; appToken = new Token (this , service); ... ... ... ... }
这个 token 是 ActivityRecord 的内部类,继承了 IApplicationToken.Stub 类:
1
2
3
4
5
6
7
8
9
10
static class Token extends IApplicationToken .Stub { private final WeakReference<ActivityRecord> weakActivity; private final ActivityManagerService mService; Token(ActivityRecord activity, ActivityManagerService service) { weakActivity = new WeakReference <>(activity); mService = service; } ... ... ... }
这个 Token 会传递进入应用进程,保存到应用进程,然后在 addView 的时候再传递进系统进程的。
2.2 Activity 2.2.1 attach - 核心方法 关键核心代码在 attach :
1
2
3
4
5
6
7
8
9
10
11
12
13
14
15
16
17
18
19
20
21
22
23
24
25
26
27
28
29
30
31
32
33
34
35
36
37
38
39
40
41
42
43
44
45
final void attach (Context context, ActivityThread aThread, Instrumentation instr, IBinder token, int ident, Application application, Intent intent, ActivityInfo info, CharSequence title, Activity parent, String id, NonConfigurationInstances lastNonConfigurationInstances, Configuration config, String referrer, IVoiceInteractor voiceInteractor) { attachBaseContext(context); mFragments.attachHost(null ); mWindow = new PhoneWindow (this , window); mWindow.setWindowControllerCallback(this ); mWindow.setCallback(this ); mWindow.setOnWindowDismissedCallback(this ); if (info.softInputMode != WindowManager.LayoutParams.SOFT_INPUT_STATE_UNSPECIFIED) { mWindow.setSoftInputMode(info.softInputMode); } if (info.uiOptions != 0 ) { mWindow.setUiOptions(info.uiOptions); } mUiThread = Thread.currentThread(); mMainThread = aThread; mInstrumentation = instr; mToken = token; mIdent = ident; ... ... ... mWindow.setWindowManager( (WindowManager)context.getSystemService(Context.WINDOW_SERVICE), mToken, mComponent.flattenToString(), (info.flags & ActivityInfo.FLAG_HARDWARE_ACCELERATED) != 0 ); if (mParent != null ) { mWindow.setContainer(mParent.getWindow()); } mWindowManager = mWindow.getWindowManager(); mCurrentConfig = config; }
整体流程比较清晰,这里的 mToken 是一个 Binder 引用:
继续!
2.3 PhoneWindow PhoneWindow 继承了 Window 抽象类,他也是 window 类的唯一实现!
PhoneWindow 将 DecorView 作为 root view,这里的 DecorView 实际上是一个 FrameLayout!
每一个 activity 都会有一个 PhoneWindow,他是 Activity 和 View 交互的中间层!
1
2
3
public class PhoneWindow extends Window implements MenuBuilder .Callback { ... ... ... }
2.3.1 new PhoneWindow 创建一个 PhoneWindow 实例,同时创建 LayoutInflater 实例,其用于加载布局文件!
参数:Context context 是所属的 activity;
1 2 3 4 5 6 7 8 9 10 11 12 13 14 15 16 17 18 19 20 21 22 23 24 public PhoneWindow (Context context, Window preservedWindow) { this (context); mUseDecorContext = true ; if (preservedWindow != null ) { mDecor = (DecorView) preservedWindow.getDecorView(); mElevation = preservedWindow.getElevation(); mLoadElevation = false ; mForceDecorInstall = true ; getAttributes().token = preservedWindow.getAttributes().token; } boolean forceResizable = Settings.Global.getInt(context.getContentResolver(), DEVELOPMENT_FORCE_RESIZABLE_ACTIVITIES, 0 ) != 0 ; mSupportsPictureInPicture = forceResizable || context.getPackageManager().hasSystemFeature( PackageManager.FEATURE_PICTURE_IN_PICTURE); }
其实 PhoneWindow 里面有很多的成员,这里我们先不关注,因为太多了。。。
2.4 Window Window 是一个抽象类,它提供了一系列窗口的接口,比如:setContentView 、findViewById 等等,而其唯一实现类则是 PhoneWindow 。
也就是说,其内部的一些抽象方法的最终实现,均是由 PhoneWindow。
2.4.1 setWindowManager 1 2 3 4 5 6 7 8 9 10 11 12 13 14 15 16 17 18 19 20 public void setWindowManager (WindowManager wm, IBinder appToken, String appName) { setWindowManager(wm, appToken, appName, false ); } public void setWindowManager (WindowManager wm, IBinder appToken, String appName, boolean hardwareAccelerated) { mAppToken = appToken; mAppName = appName; mHardwareAccelerated = hardwareAccelerated || SystemProperties.getBoolean(PROPERTY_HARDWARE_UI, false ); if (wm == null ) { wm = (WindowManager)mContext.getSystemService(Context.WINDOW_SERVICE); } mWindowManager = ((WindowManagerImpl)wm).createLocalWindowManager(this ); }
2.5 WindowManagerImpl WindowManagerImpl 实现了 WindowManager 接口,是对 wms 的代理的一个包装类:
1 2 3 4 5 6 7 8 9 private WindowManagerImpl (Context context, Window parentWindow) { mContext = context; mParentWindow = parentWindow; } public WindowManagerImpl createLocalWindowManager (Window parentWindow) { return new WindowManagerImpl (mContext, parentWindow); }
该类用于和 wms 进行通信!!
可以看到,createLocalWindowManager 方法传入的 parentWindow 就是我们的 PhoneWindow;
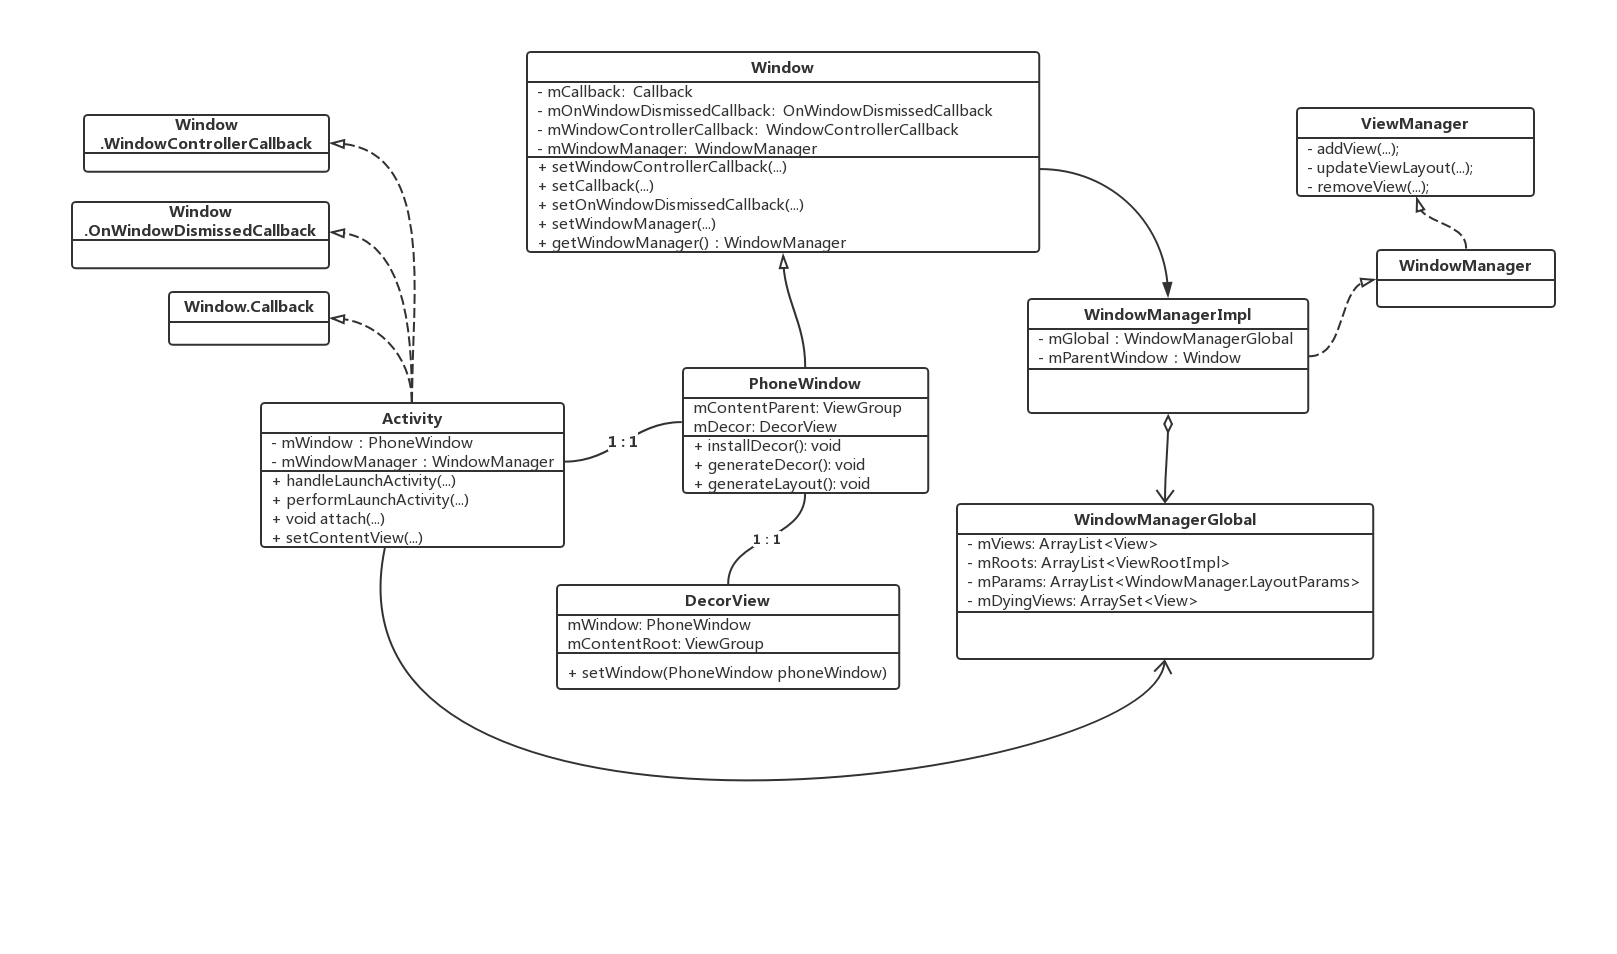
2.6 类图总结 我们来通过类图看看整个流程中,这几个伙伴之间的关系,也便于对整体有个把握,方便后续的分析:
3 Activity 下面,我们就来从 activity 入手:
3.1 setContentView setContextView 有三个重载方法,但是本质上是一样的:
1 2 3 4 5 6 7 8 9 10 11 12 13 14 15 16 17 18 public void setContentView (@LayoutRes int layoutResID) { getWindow().setContentView(layoutResID); initWindowDecorActionBar(); } public void setContentView (View view) { getWindow().setContentView(view); initWindowDecorActionBar(); } public void setContentView (View view, ViewGroup.LayoutParams params) { getWindow().setContentView(view, params); initWindowDecorActionBar(); }
3.2 getWindow 这里的 getWindow 返回的是什么呢,就是 PhoneWindow
1 2 3 4 public Window getWindow () { return mWindow; }
3.3 onWindowAttributesChanged 通知 activity 窗口的属性发生变化了!
1 2 3 4 5 6 7 8 9 10 11 12 public void onWindowAttributesChanged (WindowManager.LayoutParams params) { if (mParent == null ) { View decor = mDecor; if (decor != null && decor.getParent() != null ) { getWindowManager().updateViewLayout(decor, params); } } }
这里我们先不继续分析;
3.4 initWindowDecorActionBar 设置 actionbar:
1 2 3 4 5 6 7 8 9 10 11 12 13 14 15 16 17 private void initWindowDecorActionBar () { Window window = getWindow(); window.getDecorView(); if (isChild() || !window.hasFeature(Window.FEATURE_ACTION_BAR) || mActionBar != null ) { return ; } mActionBar = new WindowDecorActionBar (this ); mActionBar.setDefaultDisplayHomeAsUpEnabled(mEnableDefaultActionBarUp); mWindow.setDefaultIcon(mActivityInfo.getIconResource()); mWindow.setDefaultLogo(mActivityInfo.getLogoResource()); }
这里有一个 isChild() :判断一个 activity 是否嵌入到另一个 activity 中,如果是一个 chile activity,mParent 不为 null,一般哦们不用这种特性:
1 2 3 4 5 6 Activity mParent; public final boolean isChild () { return mParent != null ; }
就不多说了!
4 PhoneWindow 下面的逻辑就进入了 PhoneWindow 中了;
4.1 setContentView 我们在 activity 中一般是通过传入 layoutResID 来设置布局的:
1 2 3 4 5 6 7 8 9 10 11 12 13 14 15 16 17 18 19 20 21 22 23 24 25 26 27 28 29 30 @Override public void setContentView (int layoutResID) { if (mContentParent == null ) { installDecor(); } else if (!hasFeature(FEATURE_CONTENT_TRANSITIONS)) { mContentParent.removeAllViews(); } if (hasFeature(FEATURE_CONTENT_TRANSITIONS)) { final Scene newScene = Scene.getSceneForLayout(mContentParent, layoutResID, getContext()); transitionTo(newScene); } else { mLayoutInflater.inflate(layoutResID, mContentParent); } mContentParent.requestApplyInsets(); final Callback cb = getCallback(); if (cb != null && !isDestroyed()) { cb.onContentChanged(); } mContentParentExplicitlySet = true ; }
可以看到,在将 setContentView 设置的 布局 加载到 mContentParent 之前,还是设置了很多的工作的:installDecor!
这里的对于 mLayoutInflater.inflate 的加载机制,就先不分析了,后面单独开一帖;
当然,PhoneWindow 也有其他两个 serContentView 方法:
setContentView(View view)
1 2 3 4 5 @Override public void setContentView (View view) { setContentView(view, new ViewGroup .LayoutParams(MATCH_PARENT, MATCH_PARENT)); }
setContentView(View view, ViewGroup.LayoutParams params)
1 2 3 4 5 6 7 8 9 10 11 12 13 14 15 16 17 18 19 20 21 22 23 24 25 @Override public void setContentView (View view, ViewGroup.LayoutParams params) { if (mContentParent == null ) { installDecor(); } else if (!hasFeature(FEATURE_CONTENT_TRANSITIONS)) { mContentParent.removeAllViews(); } if (hasFeature(FEATURE_CONTENT_TRANSITIONS)) { view.setLayoutParams(params); final Scene newScene = new Scene (mContentParent, view); transitionTo(newScene); } else { mContentParent.addView(view, params); } mContentParent.requestApplyInsets(); final Callback cb = getCallback(); if (cb != null && !isDestroyed()) { cb.onContentChanged(); } mContentParentExplicitlySet = true ; }
这里的 mContentParent 是一个 ViewGroup 实例,很简单不多说;
4.2 installDecor 创建 DecorView:
1 2 3 4 5 6 7 8 9 10 11 12 13 14 15 16 17 18 19 20 21 22 23 24 25 26 27 28 29 30 31 32 33 34 35 36 37 38 39 40 41 42 43 44 45 46 47 48 49 50 51 52 53 54 55 56 57 58 59 60 61 62 63 64 65 66 67 68 69 70 71 72 73 74 75 76 77 78 79 80 81 82 83 84 85 86 87 88 89 90 91 92 93 94 95 96 private void installDecor () { mForceDecorInstall = false ; if (mDecor == null ) { mDecor = generateDecor(-1 ); mDecor.setDescendantFocusability(ViewGroup.FOCUS_AFTER_DESCENDANTS); mDecor.setIsRootNamespace(true ); if (!mInvalidatePanelMenuPosted && mInvalidatePanelMenuFeatures != 0 ) { mDecor.postOnAnimation(mInvalidatePanelMenuRunnable); } } else { mDecor.setWindow(this ); } if (mContentParent == null ) { mContentParent = generateLayout(mDecor); mDecor.makeOptionalFitsSystemWindows(); final DecorContentParent decorContentParent = (DecorContentParent) mDecor.findViewById( R.id.decor_content_parent); if (decorContentParent != null ) { mDecorContentParent = decorContentParent; mDecorContentParent.setWindowCallback(getCallback()); if (mDecorContentParent.getTitle() == null ) { mDecorContentParent.setWindowTitle(mTitle); } final int localFeatures = getLocalFeatures(); for (int i = 0 ; i < FEATURE_MAX; i++) { if ((localFeatures & (1 << i)) != 0 ) { mDecorContentParent.initFeature(i); } } mDecorContentParent.setUiOptions(mUiOptions); if ((mResourcesSetFlags & FLAG_RESOURCE_SET_ICON) != 0 || (mIconRes != 0 && !mDecorContentParent.hasIcon())) { mDecorContentParent.setIcon(mIconRes); } else if ((mResourcesSetFlags & FLAG_RESOURCE_SET_ICON) == 0 && mIconRes == 0 && !mDecorContentParent.hasIcon()) { mDecorContentParent.setIcon( getContext().getPackageManager().getDefaultActivityIcon()); mResourcesSetFlags |= FLAG_RESOURCE_SET_ICON_FALLBACK; } if ((mResourcesSetFlags & FLAG_RESOURCE_SET_LOGO) != 0 || (mLogoRes != 0 && !mDecorContentParent.hasLogo())) { mDecorContentParent.setLogo(mLogoRes); } PanelFeatureState st = getPanelState(FEATURE_OPTIONS_PANEL, false ); if (!isDestroyed() && (st == null || st.menu == null ) && !mIsStartingWindow) { invalidatePanelMenu(FEATURE_ACTION_BAR); } } else { mTitleView = (TextView) findViewById(R.id.title); if (mTitleView != null ) { if ((getLocalFeatures() & (1 << FEATURE_NO_TITLE)) != 0 ) { final View titleContainer = findViewById(R.id.title_container); if (titleContainer != null ) { titleContainer.setVisibility(View.GONE); } else { mTitleView.setVisibility(View.GONE); } mContentParent.setForeground(null ); } else { mTitleView.setText(mTitle); } } } if (mDecor.getBackground() == null && mBackgroundFallbackResource != 0 ) { mDecor.setBackgroundFallback(mBackgroundFallbackResource); } if (hasFeature(FEATURE_ACTIVITY_TRANSITIONS)) { ... ... ... } } }
这里的 mDecor 和 mContentParent 分别是如下的类型:
1 2 3 4 5 private DecorView mDecor;ViewGroup mContentParent;
4.2.1 generateDecor 创建 DecorView 实例:
参数 int featureId:用于表示是是否一个 activity 类型的 window(-1 表示是 activity 类型的 window)
1 2 3 4 5 6 7 8 9 10 11 12 13 14 15 16 17 18 19 20 21 22 23 24 protected DecorView generateDecor (int featureId) { Context context; if (mUseDecorContext) { Context applicationContext = getContext().getApplicationContext(); if (applicationContext == null ) { context = getContext(); } else { context = new DecorContext (applicationContext, getContext().getResources()); if (mTheme != -1 ) { context.setTheme(mTheme); } } } else { context = getContext(); } return new DecorView (context, featureId, this , getAttributes()); }
对于创建 Context 这里,我们不过多关注!
4.2.2 generateLayout 加载布局:
1 2 3 4 5 6 7 8 9 10 11 12 13 14 15 16 17 18 19 20 21 22 23 24 25 26 27 28 29 30 31 32 33 34 35 36 37 38 39 40 41 42 43 44 45 46 47 48 49 50 51 52 53 54 55 56 57 58 59 60 61 62 63 64 65 66 67 68 69 70 71 72 73 74 75 76 77 78 79 80 81 82 83 84 85 86 87 88 89 90 91 92 93 94 95 96 97 98 99 100 101 102 103 104 105 106 107 108 109 110 111 112 113 114 115 116 117 118 119 120 121 122 123 124 125 126 127 128 129 130 131 132 133 134 135 136 137 138 139 140 141 142 143 144 145 146 147 148 149 150 151 152 153 154 155 156 157 158 159 160 161 162 163 164 165 166 167 168 169 170 171 172 173 174 175 176 177 178 179 180 181 182 183 184 185 186 187 188 189 190 191 192 193 194 195 196 197 198 199 200 201 202 203 204 205 206 207 208 209 210 211 212 213 214 215 216 217 218 219 220 221 222 223 224 225 226 227 228 229 230 231 232 233 234 235 236 237 238 239 240 241 242 243 244 245 246 247 248 249 250 251 252 253 254 255 256 257 258 259 260 261 262 263 264 265 266 267 268 269 270 271 272 273 274 275 276 277 278 279 280 281 282 283 284 285 286 287 288 289 290 291 292 293 294 295 296 297 298 299 300 301 302 303 304 305 306 307 308 309 310 311 312 313 314 315 316 317 318 319 320 321 322 323 324 325 326 327 328 329 330 331 332 333 334 335 336 337 338 339 340 341 342 343 344 345 346 347 348 349 350 351 352 353 354 355 356 357 358 359 360 361 362 363 364 365 366 367 368 369 370 371 372 373 374 375 376 377 378 379 380 381 382 383 protected ViewGroup generateLayout (DecorView decor) { TypedArray a = getWindowStyle(); if (false ) { System.out.println("From style:" ); String s = "Attrs:" ; for (int i = 0 ; i < R.styleable.Window.length; i++) { s = s + " " + Integer.toHexString(R.styleable.Window[i]) + "=" + a.getString(i); } System.out.println(s); } mIsFloating = a.getBoolean(R.styleable.Window_windowIsFloating, false ); int flagsToUpdate = (FLAG_LAYOUT_IN_SCREEN | FLAG_LAYOUT_INSET_DECOR) & (~getForcedWindowFlags()); if (mIsFloating) { setLayout(WRAP_CONTENT, WRAP_CONTENT); setFlags(0 , flagsToUpdate); } else { setFlags(FLAG_LAYOUT_IN_SCREEN | FLAG_LAYOUT_INSET_DECOR, flagsToUpdate); } if (a.getBoolean(R.styleable.Window_windowNoTitle, false )) { requestFeature(FEATURE_NO_TITLE); } else if (a.getBoolean(R.styleable.Window_windowActionBar, false )) { requestFeature(FEATURE_ACTION_BAR); } if (a.getBoolean(R.styleable.Window_windowActionBarOverlay, false )) { requestFeature(FEATURE_ACTION_BAR_OVERLAY); } if (a.getBoolean(R.styleable.Window_windowActionModeOverlay, false )) { requestFeature(FEATURE_ACTION_MODE_OVERLAY); } if (a.getBoolean(R.styleable.Window_windowSwipeToDismiss, false )) { requestFeature(FEATURE_SWIPE_TO_DISMISS); } if (a.getBoolean(R.styleable.Window_windowFullscreen, false )) { setFlags(FLAG_FULLSCREEN, FLAG_FULLSCREEN & (~getForcedWindowFlags())); } if (a.getBoolean(R.styleable.Window_windowTranslucentStatus, false )) { setFlags(FLAG_TRANSLUCENT_STATUS, FLAG_TRANSLUCENT_STATUS & (~getForcedWindowFlags())); } if (a.getBoolean(R.styleable.Window_windowTranslucentNavigation, false )) { setFlags(FLAG_TRANSLUCENT_NAVIGATION, FLAG_TRANSLUCENT_NAVIGATION & (~getForcedWindowFlags())); } if (a.getBoolean(R.styleable.Window_windowOverscan, false )) { setFlags(FLAG_LAYOUT_IN_OVERSCAN, FLAG_LAYOUT_IN_OVERSCAN&(~getForcedWindowFlags())); } if (a.getBoolean(R.styleable.Window_windowShowWallpaper, false )) { setFlags(FLAG_SHOW_WALLPAPER, FLAG_SHOW_WALLPAPER&(~getForcedWindowFlags())); } if (a.getBoolean(R.styleable.Window_windowEnableSplitTouch, getContext().getApplicationInfo().targetSdkVersion >= android.os.Build.VERSION_CODES.HONEYCOMB)) { setFlags(FLAG_SPLIT_TOUCH, FLAG_SPLIT_TOUCH&(~getForcedWindowFlags())); } a.getValue(R.styleable.Window_windowMinWidthMajor, mMinWidthMajor); a.getValue(R.styleable.Window_windowMinWidthMinor, mMinWidthMinor); if (DEBUG) Log.d(TAG, "Min width minor: " + mMinWidthMinor.coerceToString() + ", major: " + mMinWidthMajor.coerceToString()); if (a.hasValue(R.styleable.Window_windowFixedWidthMajor)) { if (mFixedWidthMajor == null ) mFixedWidthMajor = new TypedValue (); a.getValue(R.styleable.Window_windowFixedWidthMajor, mFixedWidthMajor); } if (a.hasValue(R.styleable.Window_windowFixedWidthMinor)) { if (mFixedWidthMinor == null ) mFixedWidthMinor = new TypedValue (); a.getValue(R.styleable.Window_windowFixedWidthMinor, mFixedWidthMinor); } if (a.hasValue(R.styleable.Window_windowFixedHeightMajor)) { if (mFixedHeightMajor == null ) mFixedHeightMajor = new TypedValue (); a.getValue(R.styleable.Window_windowFixedHeightMajor, mFixedHeightMajor); } if (a.hasValue(R.styleable.Window_windowFixedHeightMinor)) { if (mFixedHeightMinor == null ) mFixedHeightMinor = new TypedValue (); a.getValue(R.styleable.Window_windowFixedHeightMinor, mFixedHeightMinor); } if (a.getBoolean(R.styleable.Window_windowContentTransitions, false )) { requestFeature(FEATURE_CONTENT_TRANSITIONS); } if (a.getBoolean(R.styleable.Window_windowActivityTransitions, false )) { requestFeature(FEATURE_ACTIVITY_TRANSITIONS); } mIsTranslucent = a.getBoolean(R.styleable.Window_windowIsTranslucent, false ); final Context context = getContext(); final int targetSdk = context.getApplicationInfo().targetSdkVersion; final boolean targetPreHoneycomb = targetSdk < android.os.Build.VERSION_CODES.HONEYCOMB; final boolean targetPreIcs = targetSdk < android.os.Build.VERSION_CODES.ICE_CREAM_SANDWICH; final boolean targetPreL = targetSdk < android.os.Build.VERSION_CODES.LOLLIPOP; final boolean targetHcNeedsOptions = context.getResources().getBoolean( R.bool.target_honeycomb_needs_options_menu); final boolean noActionBar = !hasFeature(FEATURE_ACTION_BAR) || hasFeature(FEATURE_NO_TITLE); if (targetPreHoneycomb || (targetPreIcs && targetHcNeedsOptions && noActionBar)) { setNeedsMenuKey(WindowManager.LayoutParams.NEEDS_MENU_SET_TRUE); } else { setNeedsMenuKey(WindowManager.LayoutParams.NEEDS_MENU_SET_FALSE); } if (!mForcedStatusBarColor) { mStatusBarColor = a.getColor(R.styleable.Window_statusBarColor, 0xFF000000 ); } if (!mForcedNavigationBarColor) { mNavigationBarColor = a.getColor(R.styleable.Window_navigationBarColor, 0xFF000000 ); } WindowManager.LayoutParams params = getAttributes(); if (!mIsFloating && ActivityManager.isHighEndGfx()) { if (!targetPreL && a.getBoolean( R.styleable.Window_windowDrawsSystemBarBackgrounds, false )) { setFlags(FLAG_DRAWS_SYSTEM_BAR_BACKGROUNDS, FLAG_DRAWS_SYSTEM_BAR_BACKGROUNDS & ~getForcedWindowFlags()); } if (mDecor.mForceWindowDrawsStatusBarBackground) { params.privateFlags |= PRIVATE_FLAG_FORCE_DRAW_STATUS_BAR_BACKGROUND; } } if (a.getBoolean(R.styleable.Window_windowLightStatusBar, false )) { decor.setSystemUiVisibility( decor.getSystemUiVisibility() | View.SYSTEM_UI_FLAG_LIGHT_STATUS_BAR); } if (mAlwaysReadCloseOnTouchAttr || getContext().getApplicationInfo().targetSdkVersion >= android.os.Build.VERSION_CODES.HONEYCOMB) { if (a.getBoolean( R.styleable.Window_windowCloseOnTouchOutside, false )) { setCloseOnTouchOutsideIfNotSet(true ); } } if (!hasSoftInputMode()) { params.softInputMode = a.getInt( R.styleable.Window_windowSoftInputMode, params.softInputMode); } if (a.getBoolean(R.styleable.Window_backgroundDimEnabled, mIsFloating)) { if ((getForcedWindowFlags()&WindowManager.LayoutParams.FLAG_DIM_BEHIND) == 0 ) { params.flags |= WindowManager.LayoutParams.FLAG_DIM_BEHIND; } if (!haveDimAmount()) { params.dimAmount = a.getFloat( android.R.styleable.Window_backgroundDimAmount, 0.5f ); } } if (params.windowAnimations == 0 ) { params.windowAnimations = a.getResourceId( R.styleable.Window_windowAnimationStyle, 0 ); } if (getContainer() == null ) { if (mBackgroundDrawable == null ) { if (mBackgroundResource == 0 ) { mBackgroundResource = a.getResourceId( R.styleable.Window_windowBackground, 0 ); } if (mFrameResource == 0 ) { mFrameResource = a.getResourceId(R.styleable.Window_windowFrame, 0 ); } mBackgroundFallbackResource = a.getResourceId( R.styleable.Window_windowBackgroundFallback, 0 ); if (false ) { System.out.println("Background: " + Integer.toHexString(mBackgroundResource) + " Frame: " + Integer.toHexString(mFrameResource)); } } if (mLoadElevation) { mElevation = a.getDimension(R.styleable.Window_windowElevation, 0 ); } mClipToOutline = a.getBoolean(R.styleable.Window_windowClipToOutline, false ); mTextColor = a.getColor(R.styleable.Window_textColor, Color.TRANSPARENT); } int layoutResource; int features = getLocalFeatures(); if ((features & (1 << FEATURE_SWIPE_TO_DISMISS)) != 0 ) { layoutResource = R.layout.screen_swipe_dismiss; } else if ((features & ((1 << FEATURE_LEFT_ICON) | (1 << FEATURE_RIGHT_ICON))) != 0 ) { if (mIsFloating) { TypedValue res = new TypedValue (); getContext().getTheme().resolveAttribute( R.attr.dialogTitleIconsDecorLayout, res, true ); layoutResource = res.resourceId; } else { layoutResource = R.layout.screen_title_icons; } removeFeature(FEATURE_ACTION_BAR); } else if ((features & ((1 << FEATURE_PROGRESS) | (1 << FEATURE_INDETERMINATE_PROGRESS))) != 0 && (features & (1 << FEATURE_ACTION_BAR)) == 0 ) { layoutResource = R.layout.screen_progress; } else if ((features & (1 << FEATURE_CUSTOM_TITLE)) != 0 ) { if (mIsFloating) { TypedValue res = new TypedValue (); getContext().getTheme().resolveAttribute( R.attr.dialogCustomTitleDecorLayout, res, true ); layoutResource = res.resourceId; } else { layoutResource = R.layout.screen_custom_title; } removeFeature(FEATURE_ACTION_BAR); } else if ((features & (1 << FEATURE_NO_TITLE)) == 0 ) { if (mIsFloating) { TypedValue res = new TypedValue (); getContext().getTheme().resolveAttribute( R.attr.dialogTitleDecorLayout, res, true ); layoutResource = res.resourceId; } else if ((features & (1 << FEATURE_ACTION_BAR)) != 0 ) { layoutResource = a.getResourceId( R.styleable.Window_windowActionBarFullscreenDecorLayout, R.layout.screen_action_bar); } else { layoutResource = R.layout.screen_title; } } else if ((features & (1 << FEATURE_ACTION_MODE_OVERLAY)) != 0 ) { layoutResource = R.layout.screen_simple_overlay_action_mode; } else { layoutResource = R.layout.screen_simple; } mDecor.startChanging(); mDecor.onResourcesLoaded(mLayoutInflater, layoutResource); ViewGroup contentParent = (ViewGroup)findViewById(ID_ANDROID_CONTENT); if (contentParent == null ) { throw new RuntimeException ("Window couldn't find content container view" ); } if ((features & (1 << FEATURE_INDETERMINATE_PROGRESS)) != 0 ) { ProgressBar progress = getCircularProgressBar(false ); if (progress != null ) { progress.setIndeterminate(true ); } } if ((features & (1 << FEATURE_SWIPE_TO_DISMISS)) != 0 ) { registerSwipeCallbacks(); } if (getContainer() == null ) { final Drawable background; if (mBackgroundResource != 0 ) { background = getContext().getDrawable(mBackgroundResource); } else { background = mBackgroundDrawable; } mDecor.setWindowBackground(background); final Drawable frame; if (mFrameResource != 0 ) { frame = getContext().getDrawable(mFrameResource); } else { frame = null ; } mDecor.setWindowFrame(frame); mDecor.setElevation(mElevation); mDecor.setClipToOutline(mClipToOutline); if (mTitle != null ) { setTitle(mTitle); } if (mTitleColor == 0 ) { mTitleColor = mTextColor; } setTitleColor(mTitleColor); } mDecor.finishChanging(); return contentParent; }
这里大家对下面的计算可能摸不着头脑:
1 setFlags(FLAG_FULLSCREEN, FLAG_FULLSCREEN & (~getForcedWindowFlags()));
分情况下:
如果 getForcedWindowFlags() 没有设置 FLAG_FULLSCREEN,那么 FLAG_FULLSCREEN & (~getForcedWindowFlags()) 为 FLAG_FULLSCREEN
如果 getForcedWindowFlags() 设置了 FLAG_FULLSCREEN,那么 FLAG_FULLSCREEN & (~getForcedWindowFlags()) 为 0;
然后大家可以分析 setLayout 方法是如何处理的了;
其实,整个过程:
第一个阶段,是在处理 window 的 theme 和 flags,因为这些设置会影响 window 的特性;
第二个阶段,是选择 root 布局,并加载到 DecorView;
4.2.2.1 requestFeature 应用窗口特性:
参数 featureId 是特性的 id ,需要将其转为对应的二进制序列:(1 << featureId) ;
1 2 3 4 5 6 7 8 9 10 11 12 13 14 15 16 17 18 19 20 21 22 23 24 25 26 27 28 29 30 31 32 33 34 35 36 37 38 39 40 41 42 43 44 45 46 @Override public boolean requestFeature (int featureId) { if (mContentParentExplicitlySet) { throw new AndroidRuntimeException ("requestFeature() must be called before adding content" ); } final int features = getFeatures(); final int newFeatures = features | (1 << featureId); if ((newFeatures & (1 << FEATURE_CUSTOM_TITLE)) != 0 && (newFeatures & ~CUSTOM_TITLE_COMPATIBLE_FEATURES) != 0 ) { throw new AndroidRuntimeException ( "You cannot combine custom titles with other title features" ); } if ((features & (1 << FEATURE_NO_TITLE)) != 0 && featureId == FEATURE_ACTION_BAR) { return false ; } if ((features & (1 << FEATURE_ACTION_BAR)) != 0 && featureId == FEATURE_NO_TITLE) { removeFeature(FEATURE_ACTION_BAR); } if ((features & (1 << FEATURE_ACTION_BAR)) != 0 && featureId == FEATURE_SWIPE_TO_DISMISS) { throw new AndroidRuntimeException ( "You cannot combine swipe dismissal and the action bar." ); } if ((features & (1 << FEATURE_SWIPE_TO_DISMISS)) != 0 && featureId == FEATURE_ACTION_BAR) { throw new AndroidRuntimeException ( "You cannot combine swipe dismissal and the action bar." ); } if (featureId == FEATURE_INDETERMINATE_PROGRESS && getContext().getPackageManager().hasSystemFeature(PackageManager.FEATURE_WATCH)) { throw new AndroidRuntimeException ("You cannot use indeterminate progress on a watch." ); } return super .requestFeature(featureId); }
这里就不再继续分析了~~
下面是默认特性(DEFAULT_FEATURES)、和 CUSTOM_TITLE 特性兼容的特性的定义!
1 2 3 4 5 6 7 8 9 10 11 12 @Deprecated @SuppressWarnings({"PointlessBitwiseExpression"}) protected static final int DEFAULT_FEATURES = (1 << FEATURE_OPTIONS_PANEL) | (1 << FEATURE_CONTEXT_MENU); private static final int CUSTOM_TITLE_COMPATIBLE_FEATURES = DEFAULT_FEATURES | (1 << FEATURE_CUSTOM_TITLE) | (1 << FEATURE_CONTENT_TRANSITIONS) | (1 << FEATURE_ACTIVITY_TRANSITIONS) | (1 << FEATURE_ACTION_MODE_OVERLAY);
关于上面的特性具体的意思,这里不在详细分析。
4.2.2.2 Root 布局分析 上面的 xml 文件位于 frameworks/base/core/res/res/layout 下,我们选择几个来看看:
4.2.2.2.1 默认布局(不使用 feature) 1 2 3 4 5 6 7 8 9 10 11 12 13 14 15 16 17 18 19 20 21 <LinearLayout xmlns:android ="http://schemas.android.com/apk/res/android" android:layout_width ="match_parent" android:layout_height ="match_parent" android:fitsSystemWindows ="true" android:orientation ="vertical" > <ViewStub android:id ="@+id/action_mode_bar_stub" android:inflatedId ="@+id/action_mode_bar" android:layout ="@layout/action_mode_bar" android:layout_width ="match_parent" android:layout_height ="wrap_content" android:theme ="?attr/actionBarTheme" /> <FrameLayout android:id ="@android:id/content" android:layout_width ="match_parent" android:layout_height ="match_parent" android:foregroundInsidePadding ="false" android:foregroundGravity ="fill_horizontal|top" android:foreground ="?android:attr/windowContentOverlay" /> </LinearLayout >
4.2.2.2.2 支持滑动退出的布局 1 2 3 4 5 6 7 8 <com.android.internal.widget.SwipeDismissLayout xmlns:android ="http://schemas.android.com/apk/res/android" android:id ="@android:id/content" android:fitsSystemWindows ="true" android:layout_width ="match_parent" android:layout_height ="match_parent" />
4.2.2.2.3 只有一个进度条的布局 1 2 3 4 5 6 7 8 9 10 11 12 13 14 15 16 17 18 19 20 <FrameLayout xmlns:android ="http://schemas.android.com/apk/res/android" android:layout_width ="match_parent" android:layout_height ="match_parent" android:fitsSystemWindows ="true" > <FrameLayout android:id ="@android:id/content" android:layout_width ="match_parent" android:layout_height ="match_parent" android:foregroundInsidePadding ="false" android:foregroundGravity ="fill_horizontal|top" android:foreground ="?android:attr/windowContentOverlay" /> <ViewStub android:id ="@+id/action_mode_bar_stub" android:inflatedId ="@+id/action_mode_bar" android:layout ="@layout/action_mode_bar" android:layout_width ="match_parent" android:layout_height ="wrap_content" android:theme ="?attr/actionBarTheme" /> </FrameLayout >
4.2.2.2.4 总结 通过布局的分析,我们可以知道:
所有的布局都会有一个 id 为 “@android:id/content” 的 Layout,这个 Layout 就是用来放置我们 setContentView 设置的 content 的;
4.2 dispatchWindowAttributesChanged 1 2 3 4 5 6 7 8 @Override protected void dispatchWindowAttributesChanged (WindowManager.LayoutParams attrs) { super .dispatchWindowAttributesChanged(attrs); if (mDecor != null ) { mDecor.updateColorViews(null , true ); } }
5 Window 是一个抽象类,定义了窗口的所有公共操作和属性,phoneWindow 是他的唯一实现类;
5.1 new Window 由于 PhoneWindow 是其唯一的实现类,所以一般只有通过 new PhoneWindow 才能触发父类构造器:
1 2 3 4 5 6 public Window (Context context) { mContext = context; mFeatures = mLocalFeatures = getDefaultFeatures(context); }
方法很简单,Window 内部也有很多的成员变量,这里我们不一一分析,我们后面会边跟代码,边分析内部的变量!
mFeatures 和 mLocalFeatures 是 window 内部的窗口特性,是一个二进制序列;
getDefaultFeatures :获取默认的 feature 配置,这个方法不太重要,就不单独列出来了!
1 2 3 4 5 6 7 8 9 10 11 12 13 14 15 16 public static int getDefaultFeatures (Context context) { int features = 0 ; final Resources res = context.getResources(); if (res.getBoolean(com.android.internal.R.bool.config_defaultWindowFeatureOptionsPanel)) { features |= 1 << FEATURE_OPTIONS_PANEL; } if (res.getBoolean(com.android.internal.R.bool.config_defaultWindowFeatureContextMenu)) { features |= 1 << FEATURE_CONTEXT_MENU; } return features; }
这里我们先来看看 Window 内部的几个接口,activity 都实现了这几个接口!
5.1.1 内部接口 5.1.1.1 Callback 这个接口用于处理事件的分发,菜单操作,窗口属性变化等事件回调:
1 2 3 4 5 6 7 public interface Callback { ... ... ... }
下面是其内部的方法,具体实现都在 activity 里面:
其内部接口很多,我们这里不过多分析!!
5.1.1.2 WindowControllerCallback 和窗口控制相关的回调接口:比如:退出 FreeForm 模式,进入画中画模式等等;
1 2 3 4 5 6 7 8 9 10 11 public interface WindowControllerCallback { void exitFreeformMode () throws RemoteException; void enterPictureInPictureModeIfPossible () ; int getWindowStackId () throws RemoteException; }
不多说了!
5.1.1.3 OnWindowDismissedCallback window 被销毁触发的回调:
1 2 3 4 5 public interface OnWindowDismissedCallback { void onWindowDismissed (boolean finishTask) ; }
5.2 设置 window 回调 window 有下面三个成员变量,其实都是所属的 activity,因为 activity 实现了这几个接口;
1 2 3 private Callback mCallback;private OnWindowDismissedCallback mOnWindowDismissedCallback;private WindowControllerCallback mWindowControllerCallback;
具体的作用我们后面再分析;
5.2.1 setCallback 1 2 3 public void setCallback (Callback callback) { mCallback = callback; }
5.2.2 setWindowControllerCallback 1 2 3 4 public final void setWindowControllerCallback (WindowControllerCallback wccb) { mWindowControllerCallback = wccb; }
5.2.3 setOnWindowDismissedCallback 1 2 3 4 public final void setOnWindowDismissedCallback (OnWindowDismissedCallback dcb) { mOnWindowDismissedCallback = dcb; }
5.3 getAttributes 获得当前的 activity 的 window 布局属性:
1 2 3 public final WindowManager.LayoutParams getAttributes () { return mWindowAttributes; }
这里的 mWindowAttributes 是抽象类 Window 的内部属性,表示当前 window 的布局属性:
1 2 3 private final WindowManager.LayoutParams mWindowAttributes = new WindowManager .LayoutParams();
不多说了!
5.4 setLayout 设置布局属性:
1 2 3 4 5 6 7 public void setLayout (int width, int height) { final WindowManager.LayoutParams attrs = getAttributes(); attrs.width = width; attrs.height = height; dispatchWindowAttributesChanged(attrs); }
这个方法用于设置 window 的 width/height 布局属性,默认是 MATCH_PARENT,表示的是全屏的 window!!!
如果是 WRAP_CONTENT 的话,那就不是全屏(full-screen)的 window!!
dispatchWindowAttributesChanged 方法,其子类 PhoneWindow 覆写了该方法!!
5.5 setFlags 用于设置窗口的 flags 位:
int flags:表示新的 flags 位;
int mask:要修改的窗口标志位;
1 2 3 4 5 6 7 8 9 public void setFlags (int flags, int mask) { final WindowManager.LayoutParams attrs = getAttributes(); attrs.flags = (attrs.flags&~mask) | (flags&mask); mForcedWindowFlags |= mask; dispatchWindowAttributesChanged(attrs); }
我们看到,其实最终生效的 flags,是保存在 WindowManager.LayoutParams 中!
这里的 mForcedWindowFlags 用来保存:应用程序显式设置的 flags 标志位,默认值为 0;
1 2 3 4 5 6 private int mForcedWindowFlags = 0 ;protected final int getForcedWindowFlags () { return mForcedWindowFlags; }
1 2 3 public void addFlags (int flags) { setFlags(flags, flags); }
1 2 3 public void clearFlags (int flags) { setFlags(0 , flags); }
5.6 dispatchWindowAttributesChanged 分发窗口属性变化的消息:
1 2 3 4 5 6 7 protected void dispatchWindowAttributesChanged (WindowManager.LayoutParams attrs) { if (mCallback != null ) { mCallback.onWindowAttributesChanged(attrs); } }
回调通知,不多说。
6 DecorView 可以看到 DecorView 本质上是一个 FrameLayout!
1 2 3 4 5 6 7 8 9 public class DecorView extends FrameLayout implements RootViewSurfaceTaker , WindowCallbacks { ... ... ... private PhoneWindow mWindow; ViewGroup mContentRoot; ... ... ... }
同时他也实现了 RootViewSurfaceTaker 和 WindowCallbacks 接口!
当然,对于 DecorView 其内部成员也很多,这里也就不一一分析。。。
6.1 new DecorView 我们来看看创建 DecorView 实例:
1 2 3 4 5 6 7 8 9 10 11 12 13 14 15 16 17 18 19 20 21 22 23 24 25 26 27 28 29 30 DecorView(Context context, int featureId, PhoneWindow window, WindowManager.LayoutParams params) { super (context); mFeatureId = featureId; mShowInterpolator = AnimationUtils.loadInterpolator(context, android.R.interpolator.linear_out_slow_in); mHideInterpolator = AnimationUtils.loadInterpolator(context, android.R.interpolator.fast_out_linear_in); mBarEnterExitDuration = context.getResources().getInteger( R.integer.dock_enter_exit_duration); mForceWindowDrawsStatusBarBackground = context.getResources().getBoolean( R.bool.config_forceWindowDrawsStatusBarBackground) && context.getApplicationInfo().targetSdkVersion >= N; mSemiTransparentStatusBarColor = context.getResources().getColor( R.color.system_bar_background_semi_transparent, null ); updateAvailableWidth(); setWindow(window); updateLogTag(params); mResizeShadowSize = context.getResources().getDimensionPixelSize( R.dimen.resize_shadow_size); initResizingPaints(); }
这个 mFeatureId 是 DecorView 的成员:
1 2 private final int mFeatureId;
6.2 setWindow 将 PhoneWindow 和 Context 的实例保存到 DecorView 中;
1 2 3 4 5 6 7 8 9 10 void setWindow (PhoneWindow phoneWindow) { mWindow = phoneWindow; Context context = getContext(); if (context instanceof DecorContext) { DecorContext decorContext = (DecorContext) context; decorContext.setPhoneWindow(mWindow); } }
不多说了!
6.3 startChanging / finishChanging 用于(结束)标记 DecorView 正在加载:
1 2 3 4 5 6 7 8 9 void startChanging () { mChanging = true ; } void finishChanging () { mChanging = false ; drawableChanged(); }
6.4 onResourcesLoaded 加载布局资源:
1 2 3 4 5 6 7 8 9 10 11 12 13 14 15 16 17 18 19 20 21 22 23 24 25 26 27 28 29 30 31 32 33 void onResourcesLoaded (LayoutInflater inflater, int layoutResource) { mStackId = getStackId(); if (mBackdropFrameRenderer != null ) { loadBackgroundDrawablesIfNeeded(); mBackdropFrameRenderer.onResourcesLoaded( this , mResizingBackgroundDrawable, mCaptionBackgroundDrawable, mUserCaptionBackgroundDrawable, getCurrentColor(mStatusColorViewState), getCurrentColor(mNavigationColorViewState)); } mDecorCaptionView = createDecorCaptionView(inflater); final View root = inflater.inflate(layoutResource, null ); if (mDecorCaptionView != null ) { if (mDecorCaptionView.getParent() == null ) { addView(mDecorCaptionView, new ViewGroup .LayoutParams(MATCH_PARENT, MATCH_PARENT)); } mDecorCaptionView.addView(root, new ViewGroup .MarginLayoutParams(MATCH_PARENT, MATCH_PARENT)); } else { addView(root, 0 , new ViewGroup .LayoutParams(MATCH_PARENT, MATCH_PARENT)); } mContentRoot = (ViewGroup) root; initializeElevation(); }
可以看到:
主要流程就是加载 layoutResource 对应的布局文件(content root),加载的 view 会保存到 DecorView.mContentRoot 中;
然后通过 addView 将 content root 其加载到 DecorView 中去;
我们去看看 ViewGroup 的 addView 方法,可以看到也调用了 requestLayout() 和 invalidate(true) 方法!
1 2 3 4 5 6 7 8 9 10 11 12 13 14 15 16 17 public void addView (View child, int index, LayoutParams params) { if (DBG) { System.out.println(this + " addView" ); } if (child == null ) { throw new IllegalArgumentException ("Cannot add a null child view to a ViewGroup" ); } requestLayout(); invalidate(true ); addViewInner(child, index, params, false ); }
这里虽然调用了 requestLayout 和 invalidate 实际上并没有开始布局和绘制,原因是 ViewRootImpl 还没有创建;
6.5 setWindowBackground / setWindowFrame 设置 window 背景和 frame:
1 2 3 4 5 6 7 8 9 10 11 12 13 14 15 16 17 18 19 20 21 22 23 24 25 26 27 28 29 30 31 32 33 public void setWindowBackground (Drawable drawable) { if (getBackground() != drawable) { setBackgroundDrawable(drawable); if (drawable != null ) { mResizingBackgroundDrawable = enforceNonTranslucentBackground(drawable, mWindow.isTranslucent() || mWindow.isShowingWallpaper()); } else { mResizingBackgroundDrawable = getResizingBackgroundDrawable( getContext(), 0 , mWindow.mBackgroundFallbackResource, mWindow.isTranslucent() || mWindow.isShowingWallpaper()); } if (mResizingBackgroundDrawable != null ) { mResizingBackgroundDrawable.getPadding(mBackgroundPadding); } else { mBackgroundPadding.setEmpty(); } drawableChanged(); } } public void setWindowFrame (Drawable drawable) { if (getForeground() != drawable) { setForeground(drawable); if (drawable != null ) { drawable.getPadding(mFramePadding); } else { mFramePadding.setEmpty(); } drawableChanged(); } }
可以看到,这里都调用了 drawableChanged 方法:
6.6 drawableChanged 可绘制的区域发生的变化,实际上就是 window 的属性发生了变化:
1 2 3 4 5 6 7 8 9 10 11 12 13 14 15 16 17 18 19 20 21 22 23 24 25 26 27 28 29 30 31 32 33 34 35 36 37 38 39 40 41 42 43 44 45 46 47 48 49 50 51 52 53 54 55 56 57 58 59 60 61 62 63 64 65 66 67 68 69 private void drawableChanged () { if (mChanging) { return ; } setPadding(mFramePadding.left + mBackgroundPadding.left, mFramePadding.top + mBackgroundPadding.top, mFramePadding.right + mBackgroundPadding.right, mFramePadding.bottom + mBackgroundPadding.bottom); requestLayout(); invalidate(); int opacity = PixelFormat.OPAQUE; if (StackId.hasWindowShadow(mStackId)) { opacity = PixelFormat.TRANSLUCENT; } else { Drawable bg = getBackground(); Drawable fg = getForeground(); if (bg != null ) { if (fg == null ) { opacity = bg.getOpacity(); } else if (mFramePadding.left <= 0 && mFramePadding.top <= 0 && mFramePadding.right <= 0 && mFramePadding.bottom <= 0 ) { int fop = fg.getOpacity(); int bop = bg.getOpacity(); if (false ) Log.v(mLogTag, "Background opacity: " + bop + ", Frame opacity: " + fop); if (fop == PixelFormat.OPAQUE || bop == PixelFormat.OPAQUE) { opacity = PixelFormat.OPAQUE; } else if (fop == PixelFormat.UNKNOWN) { opacity = bop; } else if (bop == PixelFormat.UNKNOWN) { opacity = fop; } else { opacity = Drawable.resolveOpacity(fop, bop); } } else { if (false ) Log.v(mLogTag, "Padding: " + mFramePadding); opacity = PixelFormat.TRANSLUCENT; } } if (false ) Log.v(mLogTag, "Background: " + bg + ", Frame: " + fg); } if (false ) Log.v(mLogTag, "Selected default opacity: " + opacity); mDefaultOpacity = opacity; if (mFeatureId < 0 ) { mWindow.setDefaultWindowFormat(opacity); } }
这里核心的代码就是:
1 2 3 4 5 6 7 8 9 10 setPadding(mFramePadding.left + mBackgroundPadding.left, mFramePadding.top + mBackgroundPadding.top, mFramePadding.right + mBackgroundPadding.right, mFramePadding.bottom + mBackgroundPadding.bottom); requestLayout(); invalidate();
这里就不再继续跟踪了,requestLayout 和 invalidate 后面再分析。
7 总结 我们来看下整个的流程吧:
1 2 3 4 5 6 7 8 9 10 11 12 13 14 15 16 17 18 19 20 21 22 23 24 25 26 27 28 29 30 31 32 ActivityThread -> ActivityThread : 1.handleLaunchActivity ActivityThread -> WindowManagerGlobal : 2.initialize(初始化 wmg 进程单例) ActivityThread -> ActivityThread : 3.performLaunchActivity ActivityThread -> Activity : 4.attach(开始绑定) Activity -> PhoneWindow: 5.new PhoneWindow(创建 PhoneWindow 实例) PhoneWindow --> Activity: 5.return mWindow: PhoneWindow Activity -> PhoneWindow: 6.setWindowControllerCallback(设置回调) Activity -> PhoneWindow: 7.setCallback Activity -> PhoneWindow: 8.setOnWindowDismissedCallback Activity -> PhoneWindow: 9.setWindowManager Activity -> PhoneWindow: 10.getWindowManager PhoneWindow --> Activity: 10.return WindowManagerImpl ActivityThread -> Activity: 11.OnCreate Activity -> Activity: 12.setContentView (设置 layout 布局资源) Activity -> Activity: 13.getWindow Activity -> PhoneWindow: 14.setContentView PhoneWindow -> PhoneWindow: 15.installDecor PhoneWindow -> PhoneWindow: 16.generateDecor PhoneWindow -> DecorView: 17.new DecorView DecorView --> PhoneWindow: 18.return DecorView DecorView -> DecorView: 19.setWindow (设置 PhoneWindow) PhoneWindow -> PhoneWindow: 20.generateLayout(加载布局文件) onResourcesLoaded PhoneWindow -> DecorView: 21.onResourcesLoaded(该方法通过 LayoutInflater 加载布局,addView)
我画出了整个的流程图,可以发现,其实逻辑不是很复杂;
8 拓展分析 8.1 requestFeature 前面我们分析了 window feature 的概念,其实我们也可以动态设置 feature,比如我们在自己的代码中这样:
1 getWindow().requestFeature(..)
这是通过 PhoneWindow 提供的如下方法来设置的:
注意:
这个方法一定要在 setContentView 之前调用,可以调用多次!
一旦设置了 feature,那就不能关闭;
FEATURE_CUSTOM_TITLE 不能和其他的 title feature 一起使用;
1
2
3
4
5
6
public boolean requestFeature (int featureId) { final int flag = 1 <<featureId; mFeatures |= flag; mLocalFeatures |= mContainer != null ? (flag&~mContainer.mFeatures) : flag; return (mFeatures&flag) != 0 ; }
其实就是在 mFeatures 和 mLocalFeatures 的基础上,增加了 featureId 的值;