本篇文章基于 Android N - 7.1.1 主要分析下 measure 方法的执行流程;
1 回顾 我们来回顾下,performMeasure 请求测量的地方:
这里的参数:childWidthMeasureSpec 和 childHeightMeasureSpec 是 root view 也就是 DecorView 的测量标准!
1
2
3
4
5
6
7
8
9
10
private void performMeasure (int childWidthMeasureSpec, int childHeightMeasureSpec) { Trace.traceBegin(Trace.TRACE_TAG_VIEW, "measure" ); try { mView.measure(childWidthMeasureSpec, childHeightMeasureSpec); } finally { Trace.traceEnd(Trace.TRACE_TAG_VIEW); } }
mView 就是我们 DecorView,然而 DecorView 有如下的继承实现关系:
1
2
3
public class DecorView extends FrameLayout implements RootViewSurfaceTaker , WindowCallbacks {public class FrameLayout extends ViewGroup {public abstract class ViewGroup extends View implements ViewParent , ViewManager {
实际上 measure 是 view 的方法;
1.1 MeasureSpec - 测量规格 MeasureSpec 是 View 的内部类。他表示一种测量规格。MeasureSpec 由测量模式 mode 和测量大小 size 组成;
View 的测量规格是由 parent view 的测量规格和自身的 LayoutParams 共同决定的 。
1.1.1 测量模式
UNSPECIFIED :父视图不对 View 大小做限制,当然并不是真的说想要多大最后就真有多大,例如:ListView,ScrollView;
1 2 public static final int UNSPECIFIED = 0 << MODE_SHIFT;
EXACTLY :父试图已经知道了 view 确切的大小,例如:100dp 或者 march_parent
1 2 public static final int EXACTLY = 1 << MODE_SHIFT;
AT_MOST :大小不可超过某数值,例如:wrap_content
1 2 public static final int AT_MOST = 2 << MODE_SHIFT;
1.1.2 makeMeasureSpec 根据测量大小 size 和测量模式 mode 创建测量规格:
1
2
3
4
5
6
7
8
9
10
public static int makeMeasureSpec (@IntRange(from = 0, to = (1 << MeasureSpec.MODE_SHIFT) - 1) int size, @MeasureSpecMode int mode) { if (sUseBrokenMakeMeasureSpec) { return size + mode; } else { return (size & ~MODE_MASK) | (mode & MODE_MASK); } }
我们知道,MeasureSpec 是 32 位的 Int 型,高两位表示 mode,低 30 位表示 size,这里的 MODE_MASK 的作用实际上就是做位操作!
MODE_MASK 取如下的值:
1
2
private static final int MODE_SHIFT = 30 ;private static final int MODE_MASK = 0x3 << MODE_SHIFT;
其中 0x3 是十六进制,转为二进制是 11,向左移位30,结果是 11000…..0000(一共 30 个 0)!
size & ~MODE_MASK:获取 size 的低 30 位;
mode & MODE_MASK:获取 mode 的高两位;
最终合成测量规格;
2 View 2.1 measure - 核心1 View 的这个方法是被它的 parent view 调用的,而 widthMeasureSpec 和 heightMeasureSpec 则是 parent 指定的当前 view 的测量规格;
1
2
3
4
5
6
7
8
9
10
11
12
13
14
15
16
17
18
19
20
21
22
23
24
25
26
27
28
29
30
31
32
33
34
35
36
37
38
39
40
41
42
43
44
45
46
47
48
49
50
51
52
53
54
55
56
57
58
59
60
61
62
63
64
65
66
67
68
69
70
public final void measure (int widthMeasureSpec, int heightMeasureSpec) { boolean optical = isLayoutModeOptical(this ); if (optical != isLayoutModeOptical(mParent)) { Insets insets = getOpticalInsets(); int oWidth = insets.left + insets.right; int oHeight = insets.top + insets.bottom; widthMeasureSpec = MeasureSpec.adjust(widthMeasureSpec, optical ? -oWidth : oWidth); heightMeasureSpec = MeasureSpec.adjust(heightMeasureSpec, optical ? -oHeight : oHeight); } long key = (long ) widthMeasureSpec << 32 | (long ) heightMeasureSpec & 0xffffffffL ; if (mMeasureCache == null ) mMeasureCache = new LongSparseLongArray (2 ); final boolean forceLayout = (mPrivateFlags & PFLAG_FORCE_LAYOUT) == PFLAG_FORCE_LAYOUT; final boolean specChanged = widthMeasureSpec != mOldWidthMeasureSpec || heightMeasureSpec != mOldHeightMeasureSpec; final boolean isSpecExactly = MeasureSpec.getMode(widthMeasureSpec) == MeasureSpec.EXACTLY && MeasureSpec.getMode(heightMeasureSpec) == MeasureSpec.EXACTLY; final boolean matchesSpecSize = getMeasuredWidth() == MeasureSpec.getSize(widthMeasureSpec) && getMeasuredHeight() == MeasureSpec.getSize(heightMeasureSpec); final boolean needsLayout = specChanged && (sAlwaysRemeasureExactly || !isSpecExactly || !matchesSpecSize); if (forceLayout || needsLayout) { mPrivateFlags &= ~PFLAG_MEASURED_DIMENSION_SET; resolveRtlPropertiesIfNeeded(); int cacheIndex = forceLayout ? -1 : mMeasureCache.indexOfKey(key); if (cacheIndex < 0 || sIgnoreMeasureCache) { onMeasure(widthMeasureSpec, heightMeasureSpec); mPrivateFlags3 &= ~PFLAG3_MEASURE_NEEDED_BEFORE_LAYOUT; } else { long value = mMeasureCache.valueAt(cacheIndex); setMeasuredDimensionRaw((int ) (value >> 32 ), (int ) value); mPrivateFlags3 |= PFLAG3_MEASURE_NEEDED_BEFORE_LAYOUT; } if ((mPrivateFlags & PFLAG_MEASURED_DIMENSION_SET) != PFLAG_MEASURED_DIMENSION_SET) { throw new IllegalStateException ("View with id " + getId() + ": " + getClass().getName() + "#onMeasure() did not set the" + " measured dimension by calling" + " setMeasuredDimension()" ); } mPrivateFlags |= PFLAG_LAYOUT_REQUIRED; } mOldWidthMeasureSpec = widthMeasureSpec; mOldHeightMeasureSpec = heightMeasureSpec; mMeasureCache.put(key, ((long ) mMeasuredWidth) << 32 | (long ) mMeasuredHeight & 0xffffffffL ); }
执行测量!
2.2 onMeasure - 核心2.1 view 的 onMeasure 实际上很简单:
1
2
3
4
5
6
protected void onMeasure (int widthMeasureSpec, int heightMeasureSpec) { setMeasuredDimension(getDefaultSize(getSuggestedMinimumWidth(), widthMeasureSpec), getDefaultSize(getSuggestedMinimumHeight(), heightMeasureSpec)); }
该方法用于测量视图及其内容,以确定测量的宽度和测量的高度。
measure 方法会调用此方法,并且子类必须重写此方法,同时提供对其自身的准确测量。
复写此方法时, 必须调用 setMeasuredDimension 来存储此视图的测量宽度和高度。否则,将抛出 IllegalStateException 的异常。
调用超类的 onMeasure 是有效的用法。
子类应重写 onMeasure,以提供对其内容更好的度量。
如果重写此方法,则子类必须要确保测量的高度和宽度至少为视图的最小高度和宽度 getSuggestedMinimumHeight getSuggestedMinimumWidth
2.2.1 setMeasuredDimension - 核心7 保存测量的宽度和测量的高度:
1
2
3
4
5
6
7
8
9
10
11
12
13
protected final void setMeasuredDimension (int measuredWidth, int measuredHeight) { boolean optical = isLayoutModeOptical(this ); if (optical != isLayoutModeOptical(mParent)) { Insets insets = getOpticalInsets(); int opticalWidth = insets.left + insets.right; int opticalHeight = insets.top + insets.bottom; measuredWidth += optical ? opticalWidth : -opticalWidth; measuredHeight += optical ? opticalHeight : -opticalHeight; } setMeasuredDimensionRaw(measuredWidth, measuredHeight); }
这个方法必须要被 onMeasure(int, int) 调用,不然的话会抛出异常;
2.2.2 setMeasuredDimensionRaw - 核心8 存储测量的宽度和测量的高度:
1
2
3
4
5
6
private void setMeasuredDimensionRaw (int measuredWidth, int measuredHeight) { mMeasuredWidth = measuredWidth; mMeasuredHeight = measuredHeight; mPrivateFlags |= PFLAG_MEASURED_DIMENSION_SET; }
2.2.3 getDefaultSize - 核心3.1 参数 size 表示的是这个 view 默认的测量大小,measureSpec 则是 view 的测量规格,返回值表示这个 view 测量大小:
1
2
3
4
5
6
7
8
9
10
11
12
13
14
15
16
17
18
19
public static int getDefaultSize (int size, int measureSpec) { int result = size; int specMode = MeasureSpec.getMode(measureSpec); int specSize = MeasureSpec.getSize(measureSpec); switch (specMode) { case MeasureSpec.UNSPECIFIED: result = size; break ; case MeasureSpec.AT_MOST: case MeasureSpec.EXACTLY: result = specSize; break ; } return result; }
可以看到,自定义 view,重写 onMeasure 方法的,如果不针对 AT_MOST 和 EXACTLY 做处理,那么使用 wrap_content 时与 match_parent 的效果将会是一样;
2.2.3.1 getSuggestedMinimumXXXX 返回最小的宽/高:
1
2
3
4
5
6
7
8
protected int getSuggestedMinimumWidth () { return (mBackground == null ) ? mMinWidth : max(mMinWidth, mBackground.getMinimumWidth()); } protected int getSuggestedMinimumHeight () { return (mBackground == null ) ? mMinHeight : max(mMinHeight, mBackground.getMinimumHeight()); }
如果有设置背景,则获取背景 Background 的宽/高度,如果没有设置背景,则取 xml 中 android:minWidth/mMinHeight 的值;
2.3 combineMeasuredStates 合并测量状态:
1
2
3
public static int combineMeasuredStates (int curState, int newState) { return curState | newState; }
2.4 getMeasuredState 返回测量状态,实际上就是宽和高的复合整型数;
1
2
3
4
5
public final int getMeasuredState () { return (mMeasuredWidth & MEASURED_STATE_MASK) | ((mMeasuredHeight >> MEASURED_HEIGHT_STATE_SHIFT) & (MEASURED_STATE_MASK >> MEASURED_HEIGHT_STATE_SHIFT)); }
int 是 32 位,可以看到:
但它将二者存到了一个复合整型中,对于 mMeasuredWidth 取左起高 8 位,mMeasuredHeight 也是左起高 8 位;但是右移了 16 位;
1 2 3 4 5 public static final int MEASURED_STATE_MASK = 0xff000000 ; public static final int MEASURED_HEIGHT_STATE_SHIFT = 16 ;
实际结果如下:
wwww 0000 hhhh 0000
2.5 resolveSizeAndState-核心6 回顾下前面的代码,
1 2 3 4 5 setMeasuredDimension(resolveSizeAndState(maxWidth, widthMeasureSpec, childState), resolveSizeAndState(maxHeight, heightMeasureSpec, childState << MEASURED_HEIGHT_STATE_SHIFT));
参数 size:表示的是这个 view 想显示的大小;
参数 measureSpec:是 parent view 指定的测量规格(或者是自身的测量规格,这个要看情况而定);
参数 childMeasuredState:为 child view 的测量状态;
此时上面的代码调用,我们要基于 child view 的测量结果,设置 view group 的宽高;
1
2
3
4
5
6
7
8
9
10
11
12
13
14
15
16
17
18
19
20
21
22
23
24
25
26
27
28
29
public static int resolveSizeAndState (int size, int measureSpec, int childMeasuredState) { final int specMode = MeasureSpec.getMode(measureSpec); final int specSize = MeasureSpec.getSize(measureSpec); final int result; switch (specMode) { case MeasureSpec.AT_MOST: if (specSize < size) { result = specSize | MEASURED_STATE_TOO_SMALL; } else { result = size; } break ; case MeasureSpec.EXACTLY: result = specSize; break ; case MeasureSpec.UNSPECIFIED: default : result = size; } return result | (childMeasuredState & MEASURED_STATE_MASK); }
返回值是一个复合整数,实际的大小在 MEASURED_SIZE_MASK 位中,可以看到 32 位,24 位用来存储测量大小,剩下的 8 位是测量状态的;
1 2 3 4 5 6 7 8 9 10 11 public static final int MEASURED_SIZE_MASK = 0x00ffffff ; public static final int MEASURED_STATE_MASK = 0xff000000 ;
那么这个状态是什么呢,如下:
1 2 3 4 5 6 public static final int MEASURED_STATE_TOO_SMALL = 0x01000000 ;
如果如果测量约束指定的 size 小于 view 想要的 size ,那么会设置 MEASURED_STATE_TOO_SMALL 标志位
3 DecorView 3.1 onMeasure - 核心2 参数是 parent 指定的测量规格,里面包含了测量模式和 parent 的剩余大小,这里根据 parent 的测量规格,计算自身的测量模式;
1
2
3
4
5
6
7
8
9
10
11
12
13
14
15
16
17
18
19
20
21
22
23
24
25
26
27
28
29
30
31
32
33
34
35
36
37
38
39
40
41
42
43
44
45
46
47
48
49
50
51
52
53
54
55
56
57
58
59
60
61
62
63
64
65
66
67
68
69
70
71
72
73
74
75
76
77
78
79
80
81
82
83
84
85
86
87
88
89
90
91
92
93
94
95
96
97
98
99
100
101
102
103
104
105
106
107
108
109
110
111
112
113
114
115
116
117
118
119
120
121
122
123
124
125
126
127
128
@Override protected void onMeasure (int widthMeasureSpec, int heightMeasureSpec) { final DisplayMetrics metrics = getContext().getResources().getDisplayMetrics(); final boolean isPortrait = getResources().getConfiguration().orientation == ORIENTATION_PORTRAIT; final int widthMode = getMode(widthMeasureSpec); final int heightMode = getMode(heightMeasureSpec); boolean fixedWidth = false ; mApplyFloatingHorizontalInsets = false ; if (widthMode == AT_MOST) { final TypedValue tvw = isPortrait ? mWindow.mFixedWidthMinor : mWindow.mFixedWidthMajor; if (tvw != null && tvw.type != TypedValue.TYPE_NULL) { final int w; if (tvw.type == TypedValue.TYPE_DIMENSION) { w = (int ) tvw.getDimension(metrics); } else if (tvw.type == TypedValue.TYPE_FRACTION) { w = (int ) tvw.getFraction(metrics.widthPixels, metrics.widthPixels); } else { w = 0 ; } if (DEBUG_MEASURE) Log.d(mLogTag, "Fixed width: " + w); final int widthSize = MeasureSpec.getSize(widthMeasureSpec); if (w > 0 ) { widthMeasureSpec = MeasureSpec.makeMeasureSpec( Math.min(w, widthSize), EXACTLY); fixedWidth = true ; } else { widthMeasureSpec = MeasureSpec.makeMeasureSpec( widthSize - mFloatingInsets.left - mFloatingInsets.right, AT_MOST); mApplyFloatingHorizontalInsets = true ; } } } mApplyFloatingVerticalInsets = false ; if (heightMode == AT_MOST) { final TypedValue tvh = isPortrait ? mWindow.mFixedHeightMajor : mWindow.mFixedHeightMinor; if (tvh != null && tvh.type != TypedValue.TYPE_NULL) { final int h; if (tvh.type == TypedValue.TYPE_DIMENSION) { h = (int ) tvh.getDimension(metrics); } else if (tvh.type == TypedValue.TYPE_FRACTION) { h = (int ) tvh.getFraction(metrics.heightPixels, metrics.heightPixels); } else { h = 0 ; } if (DEBUG_MEASURE) Log.d(mLogTag, "Fixed height: " + h); final int heightSize = MeasureSpec.getSize(heightMeasureSpec); if (h > 0 ) { heightMeasureSpec = MeasureSpec.makeMeasureSpec( Math.min(h, heightSize), EXACTLY); } else if ((mWindow.getAttributes().flags & FLAG_LAYOUT_IN_SCREEN) == 0 ) { heightMeasureSpec = MeasureSpec.makeMeasureSpec( heightSize - mFloatingInsets.top - mFloatingInsets.bottom, AT_MOST); mApplyFloatingVerticalInsets = true ; } } } getOutsets(mOutsets); if (mOutsets.top > 0 || mOutsets.bottom > 0 ) { int mode = MeasureSpec.getMode(heightMeasureSpec); if (mode != MeasureSpec.UNSPECIFIED) { int height = MeasureSpec.getSize(heightMeasureSpec); heightMeasureSpec = MeasureSpec.makeMeasureSpec( height + mOutsets.top + mOutsets.bottom, mode); } } if (mOutsets.left > 0 || mOutsets.right > 0 ) { int mode = MeasureSpec.getMode(widthMeasureSpec); if (mode != MeasureSpec.UNSPECIFIED) { int width = MeasureSpec.getSize(widthMeasureSpec); widthMeasureSpec = MeasureSpec.makeMeasureSpec( width + mOutsets.left + mOutsets.right, mode); } } super .onMeasure(widthMeasureSpec, heightMeasureSpec); int width = getMeasuredWidth(); boolean measure = false ; widthMeasureSpec = MeasureSpec.makeMeasureSpec(width, EXACTLY); if (!fixedWidth && widthMode == AT_MOST) { final TypedValue tv = isPortrait ? mWindow.mMinWidthMinor : mWindow.mMinWidthMajor; if (tv.type != TypedValue.TYPE_NULL) { final int min; if (tv.type == TypedValue.TYPE_DIMENSION) { min = (int )tv.getDimension(metrics); } else if (tv.type == TypedValue.TYPE_FRACTION) { min = (int )tv.getFraction(mAvailableWidth, mAvailableWidth); } else { min = 0 ; } if (DEBUG_MEASURE) Log.d(mLogTag, "Adjust for min width: " + min + ", value::" + tv.coerceToString() + ", mAvailableWidth=" + mAvailableWidth); if (width < min) { widthMeasureSpec = MeasureSpec.makeMeasureSpec(min, EXACTLY); measure = true ; } } } if (measure) { super .onMeasure(widthMeasureSpec, heightMeasureSpec); } }
我们可以看到,上面的方法对 measure 传入的测量规格做了调整;
代码逻辑很简单,就不多说了;
3.1.1 getMeasuredWidth 1 2 3 4 5 6 7 8 9 10 public final int getMeasuredWidth () { return mMeasuredWidth & MEASURED_SIZE_MASK; }
3.1.2 getMode 获取测量模式:
1 2 3 4 @MeasureSpecMode public static int getMode (int measureSpec) { return (measureSpec & MODE_MASK); }
4 FrameLayout 4.1 onMeasure - 核心3 DecorView.onMeasure 进入 FrameLayout.onMeasure 方法:
1 2 3 4 5 6 7 8 9 10 11 12 13 14 15 16 17 18 19 20 21 22 23 24 25 26 27 28 29 30 31 32 33 34 35 36 37 38 39 40 41 42 43 44 45 46 47 48 49 50 51 52 53 54 55 56 57 58 59 60 61 62 63 64 65 66 67 68 69 70 71 72 73 74 75 76 77 78 79 80 81 82 83 84 85 86 87 88 89 90 91 92 93 94 95 96 97 98 99 100 101 102 103 104 105 106 107 108 109 110 111 112 113 114 115 116 @Override protected void onMeasure (int widthMeasureSpec, int heightMeasureSpec) { int count = getChildCount(); final boolean measureMatchParentChildren = MeasureSpec.getMode(widthMeasureSpec) != MeasureSpec.EXACTLY || MeasureSpec.getMode(heightMeasureSpec) != MeasureSpec.EXACTLY; mMatchParentChildren.clear(); int maxHeight = 0 ; int maxWidth = 0 ; int childState = 0 ; for (int i = 0 ; i < count; i++) { final View child = getChildAt(i); if (mMeasureAllChildren || child.getVisibility() != GONE) { measureChildWithMargins(child, widthMeasureSpec, 0 , heightMeasureSpec, 0 ); final LayoutParams lp = (LayoutParams) child.getLayoutParams(); maxWidth = Math.max(maxWidth, child.getMeasuredWidth() + lp.leftMargin + lp.rightMargin); maxHeight = Math.max(maxHeight, child.getMeasuredHeight() + lp.topMargin + lp.bottomMargin); childState = combineMeasuredStates(childState, child.getMeasuredState()); if (measureMatchParentChildren) { if (lp.width == LayoutParams.MATCH_PARENT || lp.height == LayoutParams.MATCH_PARENT) { mMatchParentChildren.add(child); } } } } maxWidth += getPaddingLeftWithForeground() + getPaddingRightWithForeground(); maxHeight += getPaddingTopWithForeground() + getPaddingBottomWithForeground(); maxHeight = Math.max(maxHeight, getSuggestedMinimumHeight()); maxWidth = Math.max(maxWidth, getSuggestedMinimumWidth()); final Drawable drawable = getForeground(); if (drawable != null ) { maxHeight = Math.max(maxHeight, drawable.getMinimumHeight()); maxWidth = Math.max(maxWidth, drawable.getMinimumWidth()); } setMeasuredDimension(resolveSizeAndState(maxWidth, widthMeasureSpec, childState), resolveSizeAndState(maxHeight, heightMeasureSpec, childState << MEASURED_HEIGHT_STATE_SHIFT)); count = mMatchParentChildren.size(); if (count > 1 ) { for (int i = 0 ; i < count; i++) { final View child = mMatchParentChildren.get(i); final MarginLayoutParams lp = (MarginLayoutParams) child.getLayoutParams(); final int childWidthMeasureSpec; if (lp.width == LayoutParams.MATCH_PARENT) { final int width = Math.max(0 , getMeasuredWidth() - getPaddingLeftWithForeground() - getPaddingRightWithForeground() - lp.leftMargin - lp.rightMargin); childWidthMeasureSpec = MeasureSpec.makeMeasureSpec( width, MeasureSpec.EXACTLY); } else { childWidthMeasureSpec = getChildMeasureSpec(widthMeasureSpec, getPaddingLeftWithForeground() + getPaddingRightWithForeground() + lp.leftMargin + lp.rightMargin, lp.width); } final int childHeightMeasureSpec; if (lp.height == LayoutParams.MATCH_PARENT) { final int height = Math.max(0 , getMeasuredHeight() - getPaddingTopWithForeground() - getPaddingBottomWithForeground() - lp.topMargin - lp.bottomMargin); childHeightMeasureSpec = MeasureSpec.makeMeasureSpec( height, MeasureSpec.EXACTLY); } else { childHeightMeasureSpec = getChildMeasureSpec(heightMeasureSpec, getPaddingTopWithForeground() + getPaddingBottomWithForeground() + lp.topMargin + lp.bottomMargin, lp.height); } child.measure(childWidthMeasureSpec, childHeightMeasureSpec); } } }
我们看到了,对于 ViewGroup u
4.1.1 getChildCount 返回内部的 child view 的个数:
1 2 3 public int getChildCount () { return mChildrenCount; }
5 ViewGroup 5.1 measureChildWithMargins - 核心4 测量 child view 自身,但是要考虑到 child 的 Margin 距离和 parent 的 padding 距离;
参数 View child:要测量的 child view;
参数 int parentWidthMeasureSpec:parent 的 width 测量约束;
参数 int widthUsed:parent view 已经被使用的距离(这个距离可能是被其他 view 使用了)
1 2 3 4 5 6 7 8 9 10 11 12 13 14 15 16 17 protected void measureChildWithMargins (View child, int parentWidthMeasureSpec, int widthUsed, int parentHeightMeasureSpec, int heightUsed) { final MarginLayoutParams lp = (MarginLayoutParams) child.getLayoutParams(); final int childWidthMeasureSpec = getChildMeasureSpec(parentWidthMeasureSpec, mPaddingLeft + mPaddingRight + lp.leftMargin + lp.rightMargin + widthUsed, lp.width); final int childHeightMeasureSpec = getChildMeasureSpec(parentHeightMeasureSpec, mPaddingTop + mPaddingBottom + lp.topMargin + lp.bottomMargin + heightUsed, lp.height); child.measure(childWidthMeasureSpec, childHeightMeasureSpec); }
ViewGroup 继承了 View,他没有 measure 方法呀,调用的依然是 View 的 measure 方法;
5.1.1 getChildMeasureSpec - 核心5 getChildMeasureSpec 将 parent view 的 MeasureSpec 信息与 child 的 LayoutParams 结合起来,为一个 child 视图的高度或宽度,确定正确的 MeasureSpec。
参数 int spec:parent view 的测量规格,parent 指定,child 需要根据他来计算自身实际的测量规格;
参数 int padding:parent view 里已经被占用的空间;
参数 int childDimension:child view 的 LayoutParams 指定的显示的大小;
1 2 3 4 5 6 7 8 9 10 11 12 13 14 15 16 17 18 19 20 21 22 23 24 25 26 27 28 29 30 31 32 33 34 35 36 37 38 39 40 41 42 43 44 45 46 47 48 49 50 51 52 53 54 55 56 57 58 59 60 61 62 63 64 65 66 67 68 69 70 71 72 73 74 75 public static int getChildMeasureSpec (int spec, int padding, int childDimension) { int specMode = MeasureSpec.getMode(spec); int specSize = MeasureSpec.getSize(spec); int size = Math.max(0 , specSize - padding); int resultSize = 0 ; int resultMode = 0 ; switch (specMode) { case MeasureSpec.EXACTLY: if (childDimension >= 0 ) { resultSize = childDimension; resultMode = MeasureSpec.EXACTLY; } else if (childDimension == LayoutParams.MATCH_PARENT) { resultSize = size; resultMode = MeasureSpec.EXACTLY; } else if (childDimension == LayoutParams.WRAP_CONTENT) { resultSize = size; resultMode = MeasureSpec.AT_MOST; } break ; case MeasureSpec.AT_MOST: if (childDimension >= 0 ) { resultSize = childDimension; resultMode = MeasureSpec.EXACTLY; } else if (childDimension == LayoutParams.MATCH_PARENT) { resultSize = size; resultMode = MeasureSpec.AT_MOST; } else if (childDimension == LayoutParams.WRAP_CONTENT) { resultSize = size; resultMode = MeasureSpec.AT_MOST; } break ; case MeasureSpec.UNSPECIFIED: if (childDimension >= 0 ) { resultSize = childDimension; resultMode = MeasureSpec.EXACTLY; } else if (childDimension == LayoutParams.MATCH_PARENT) { resultSize = View.sUseZeroUnspecifiedMeasureSpec ? 0 : size; resultMode = MeasureSpec.UNSPECIFIED; } else if (childDimension == LayoutParams.WRAP_CONTENT) { resultSize = View.sUseZeroUnspecifiedMeasureSpec ? 0 : size; resultMode = MeasureSpec.UNSPECIFIED; } break ; } return MeasureSpec.makeMeasureSpec(resultSize, resultMode); }
这个方法实际上就是 ViewGroup 的核心之一,他会根据 parent 传入的测量模式,计算每个 child 的测量模式;
6 总结 6.1 测量的条件 每次都会 measure 嘛?未必,情况下面:
1 2 3 4 5 6 7 8 9 10 11 12 final boolean specChanged = widthMeasureSpec != mOldWidthMeasureSpec || heightMeasureSpec != mOldHeightMeasureSpec; final boolean isSpecExactly = MeasureSpec.getMode(widthMeasureSpec) == MeasureSpec.EXACTLY && MeasureSpec.getMode(heightMeasureSpec) == MeasureSpec.EXACTLY; final boolean matchesSpecSize = getMeasuredWidth() == MeasureSpec.getSize(widthMeasureSpec) && getMeasuredHeight() == MeasureSpec.getSize(heightMeasureSpec); final boolean needsLayout = specChanged && (sAlwaysRemeasureExactly || !isSpecExactly || !matchesSpecSize); if (forceLayout || needsLayout) {
可以看到,其实需要一些条件的;
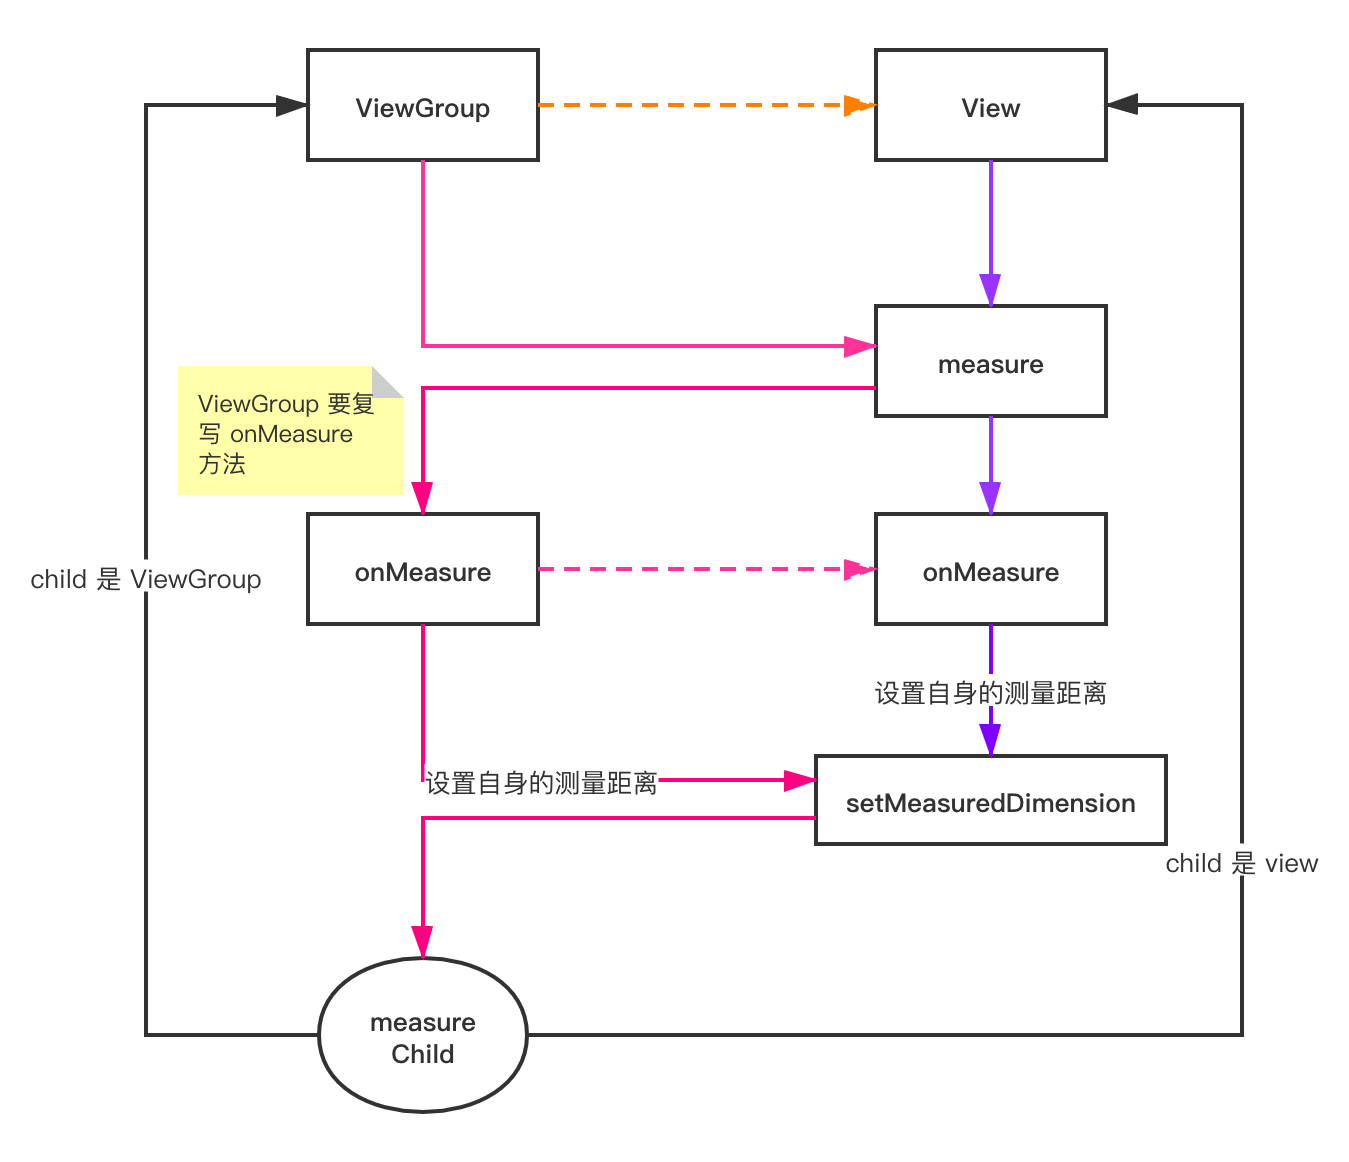
6.2 View 和 ViewGroup 的测量不同点 View:
1 measure() -> onMeasure()
这里传递进来的就是 view 的测量布局;
View Group:
1 measure() -> measureChild()/
开始是 view group 的测量规格,后面在 measureChild 中,会根据 view group 的测量规格,计算 view 的测量规格,然后进入上面 view 的逻辑:
6.3 measure 测量 上面的流程里面 measureChildWithMargins 方法,考虑到了 child view 的 margin 距离,而 ViewGroup 内部还有一个方法:
1
2
3
4
5
6
7
8
9
10
11
protected void measureChild (View child, int parentWidthMeasureSpec, int parentHeightMeasureSpec) { final LayoutParams lp = child.getLayoutParams(); final int childWidthMeasureSpec = getChildMeasureSpec(parentWidthMeasureSpec, mPaddingLeft + mPaddingRight, lp.width); final int childHeightMeasureSpec = getChildMeasureSpec(parentHeightMeasureSpec, mPaddingTop + mPaddingBottom, lp.height); child.measure(childWidthMeasureSpec, childHeightMeasureSpec); }
但是实际上,正常情况来说,margin 距离肯定是要有的,所以 measureChildWithMargins 会更有用些;